How to Download and Install HP Printer Drivers for Windows 11
You may find yourself in a situation where you need to configure your HP printer, without becoming ensnared in a web of complex technical issues.
HP has a user-centric process for downloading and installing printer drivers, helping you set up and customize it to your workflow.
Download and Install Drivers Using Windows Update
You can quickly download and install HP printer drivers in Windows 11 with its Windows Update feature.
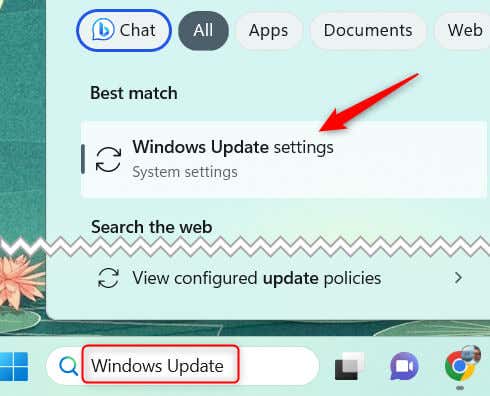
- In the Windows Search bar, type Windows Update and then select Windows Update settings from the search results.
- At the top of this page, click Check for updates. By default, Windows automatically checks for updates on a regular basis. In that case, the Check for updates option won’t appear, so you can skip this step.
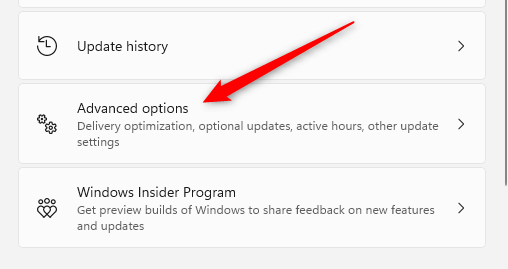
- After Windows finishes checking for updates, scroll down and select Advanced options.
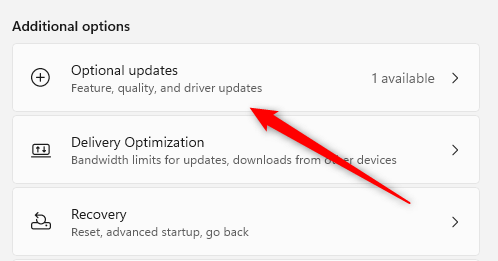
- Scroll down to the Additional options section and select the Optional updates option.
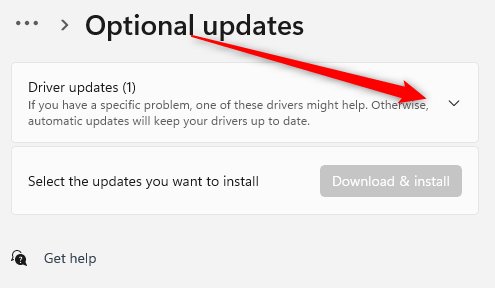
- If there are any drivers available for download, you’ll see a Driver updates option. Click it to expand it.
- Check the box next to the relevant printer driver if one is available, and then click Download & install.
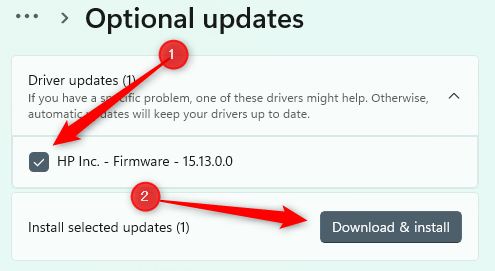
Once the download is complete, the installation will begin automatically. You can follow the on-screen instructions to finalize the process. Make sure your HP printer is connected to your computer during this process, either through a USB cable or your local network
Download and Install Drivers From the Manufacturer’s Website
If you’re not seeing the appropriate driver for your HP printer from Windows Update, the next source you’ll want to check is the HP Customer Support website.
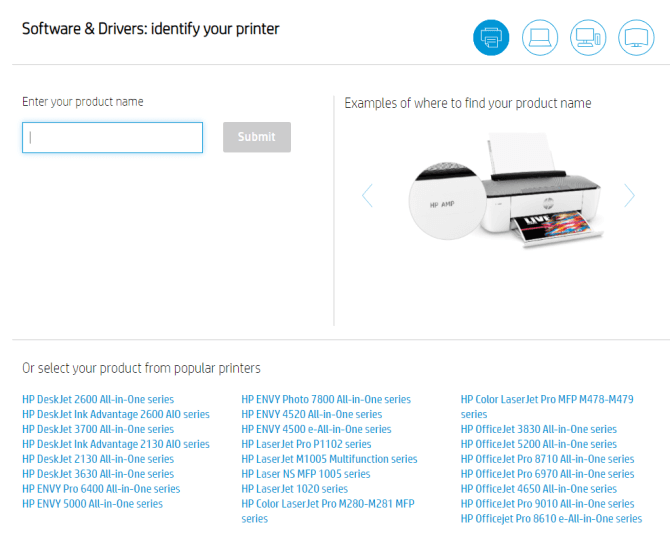
- Access the Software and Driver Download page from the official HP customer support website.
- Next, search for your product name in the search box to locate your printer. To the right of the search box, HP provides some examples of where you can find the product name on your printer. Or, you can select your printer name from the list of printers.
- After finding your printer, find the driver you’d like to install and click Download.
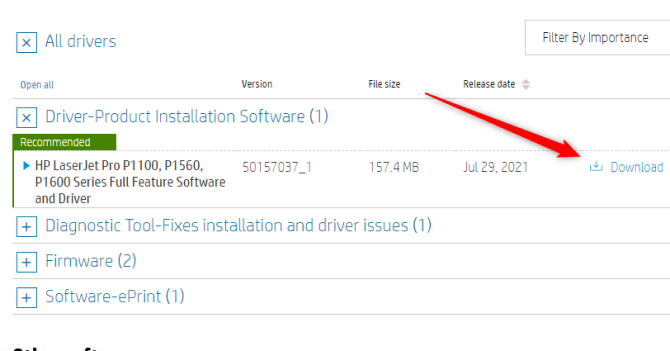
Once the driver is downloaded, you’ll need to install it. Click the file to open it, and the wizard will lead you through the process. The installation process may take a few minutes depending on your system and the size of the file. Don’t close the installation window during the process.
Reinstall the Printer
In most modern devices, printer drivers are downloaded and installed automatically. If you’re having trouble with your current drivers and aren’t sure what to do, a fresh start may be the best bet to make sure you have the most up-to-date drivers available.
To do this, go to Printers & Scanners and select Remove next to the printer. From there, select Add device and go through the setup process again. The drivers will then reinstall.
Simplifying HP Printer Driver Installation on Windows 11
Downloading and installing HP printer drivers on a Windows 11 computer is a straightforward process, provided you follow the right steps. Whether you use Windows Update to automatically fetch and install the drivers or download them manually from the HP Customer Support website, both methods are efficient and user-friendly. Remember, using up-to-date drivers is essential for maintaining the optimal performance and functionality of your HP printer.
Occasionally, you may also face issues that necessitate reinstalling the printer entirely. Always ensure your printer is correctly installed and configured for your specific needs. If you encounter any complications, don’t hesitate to seek assistance from HP Customer Support. After all, the goal is to have a smoothly functioning printer that facilitates your productivity, not hinders it.
Source : Help Desk Geek
Comments
Post a Comment