How to Install Kali Linux in VirtualBox on Your Windows PC
Kali Linux is a popular Linux distribution designed for penetration testing and ethical hacking by security professionals. Installing Kali Linux on a VirtualBox virtual machine allows you to run it on your Windows PC, providing an isolated environment for testing and learning without compromising your existing Windows installation.
Setting up Kali Linux in a virtual machine involves downloading the ISO image, creating a new virtual machine in VirtualBox, and configuring the system settings. This method allows you to interact with other virtual machines as well as the host machine, without affecting your existing Windows operating system.
To install Kali Linux on Windows 11 using VirtualBox, follow the steps below.
Enabling Virtualization on Your Windows PC
Before installing Kali Linux in VirtualBox, ensure that virtualization is enabled on your Windows PC in your BIOS/UEFI settings. This feature allows the operating system to run other operating systems as virtual machines, improving performance and compatibility.
To enable virtualization in your BIOS/UEFI settings, follow these steps.
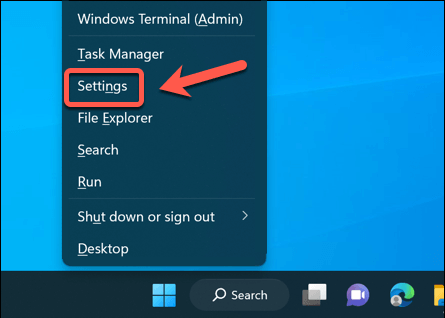
- With your Windows 11 PC booted up, right-click the Start menu and select Settings.
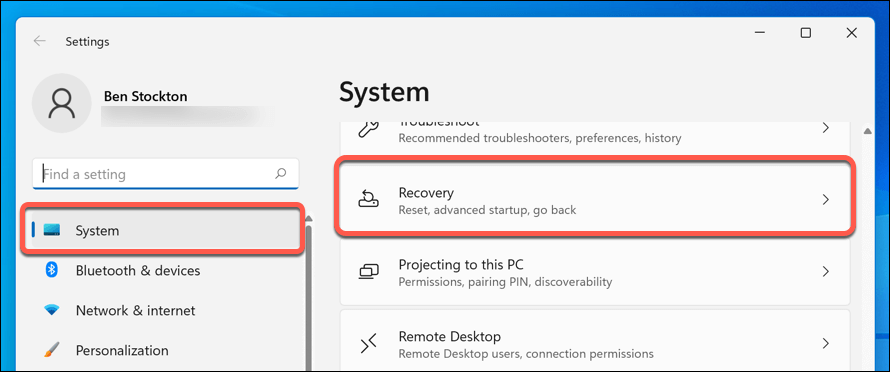
- In Settings, press System > Recovery.
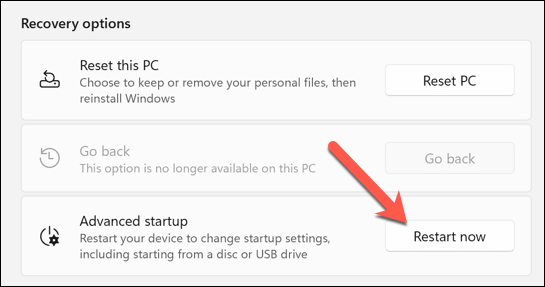
- Scroll to the Recovery options section and, next to the Advanced startup option, press Restart now.
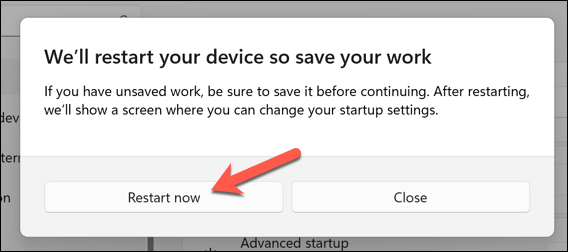
- When prompted, confirm you want to restart by pressing the Restart now button.
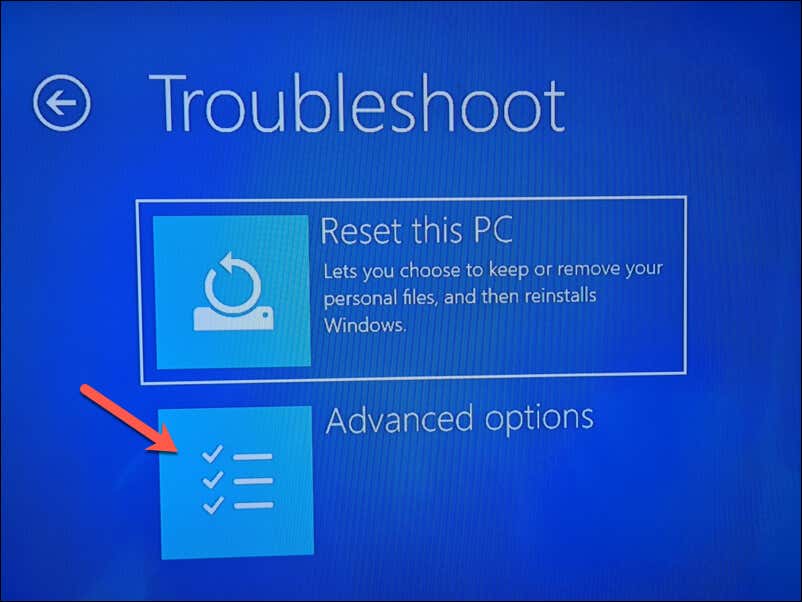
- After your PC restarts into the recovery mode menu, select Troubleshoot > Advanced Options.
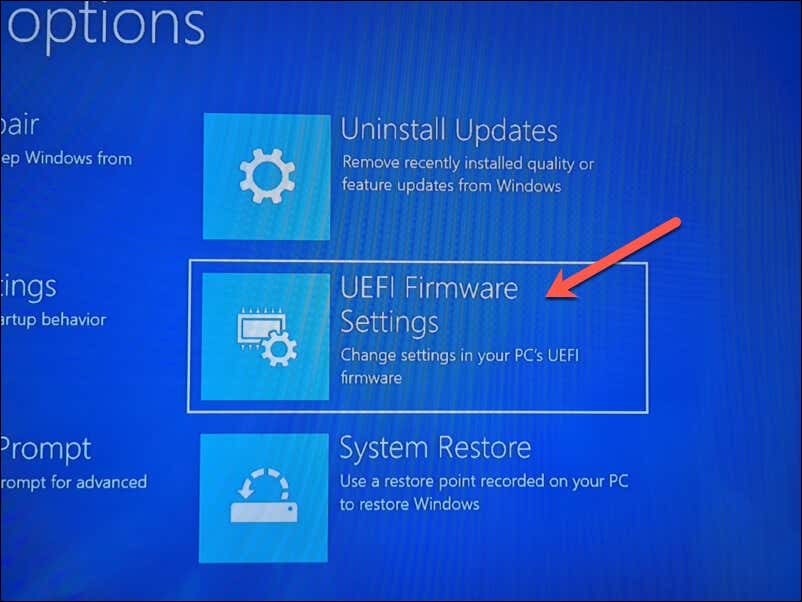
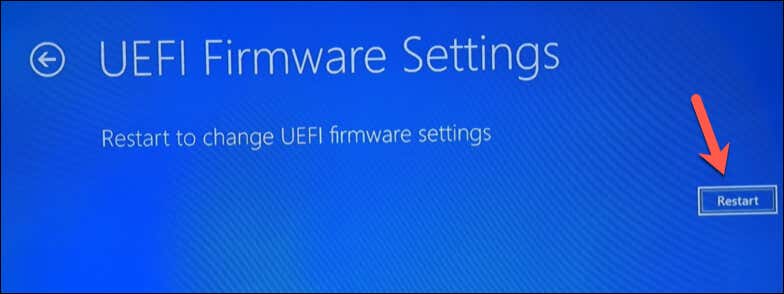
- In Advanced Options, press the UEFI Firmware Settings button.
- Press Restart to boot into your UEFI menu.
- If this doesn’t work, restart your PC manually and press the appropriate key (such as Delete or F1) to boot into your BIOS/UEFI menu manually. Check your device’s manual for the correct key to press here.
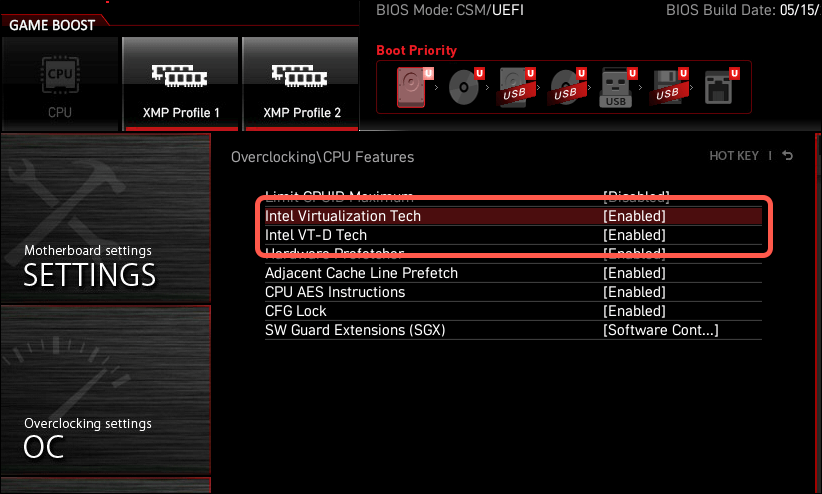
- Once you’re in your BIOS/UEFI settings, navigate to the Advanced or Processor section. Look for settings related to virtualization, such as AMD-V, Intel Virtualization Technology, Intel VT-D Tech, or similar.
- Make sure to enable the setting (or settings) for virtualization and save the change.
- Once saved, exit the BIOS or UEFI settings and restart your computer for the changes to take effect.
After enabling virtualization, you can begin installing VirtualBox (and Kali Linux).
How to Download and Install VirtualBox
There are several options for running Linux virtual machines on a Windows PC. One of the best options is VirtualBox, a free and open-source tool for virtualization. As an alternative you could use VMware, another well-known virtualization tool, although this requires a paid-for license.
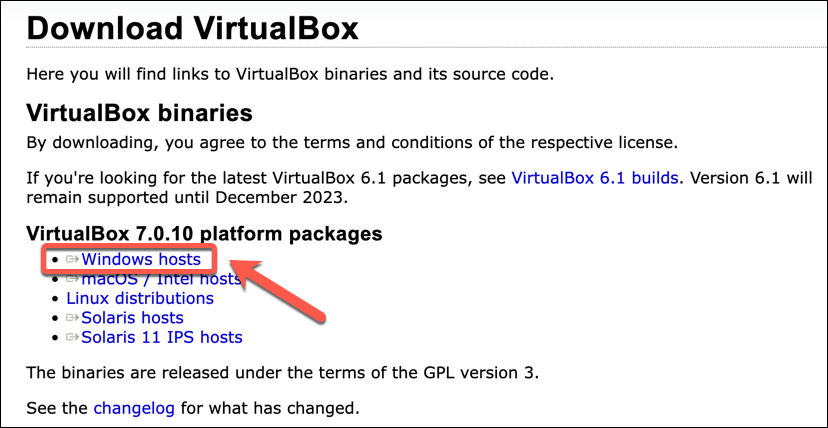
First, you’ll need to open the VirtualBox official website in your web browser. Choose the appropriate version to install—VirtualBox for Windows hosts in this case. The download should begin automatically.
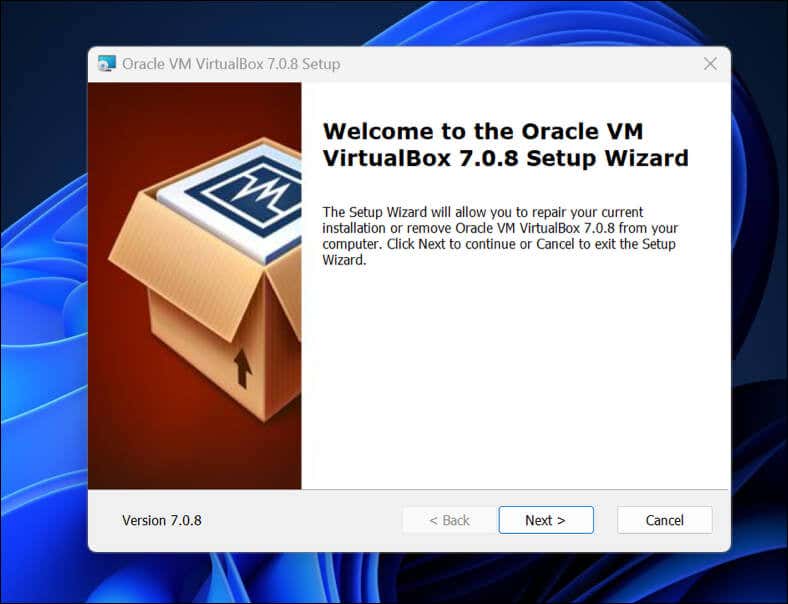
Once the download is complete, locate the installer file on your computer and double-click on it to begin the installation process. Follow the on-screen instructions during the installation, making sure to allow necessary permissions and installing any additional components.
For instance, VirtualBox will typically install a virtualized network component to allow your virtual machine to access your local network without impacting your Windows network configuration.
Once VirtualBox is installed, you’re ready to set up a new Kali Linux virtual machine.
How to Create and Configure a New Virtual Machine in VirtualBox
Once VirtualBox is installed, you’re ready to begin setting up your new Kali Linux virtual machine. Before you proceed, however, you’ll need to download the Kali Linux image file.
To do this, download the latest Kali Linux image file from the Kali Linux website. Once you’ve done that, you can set up your virtual machine by following these steps.
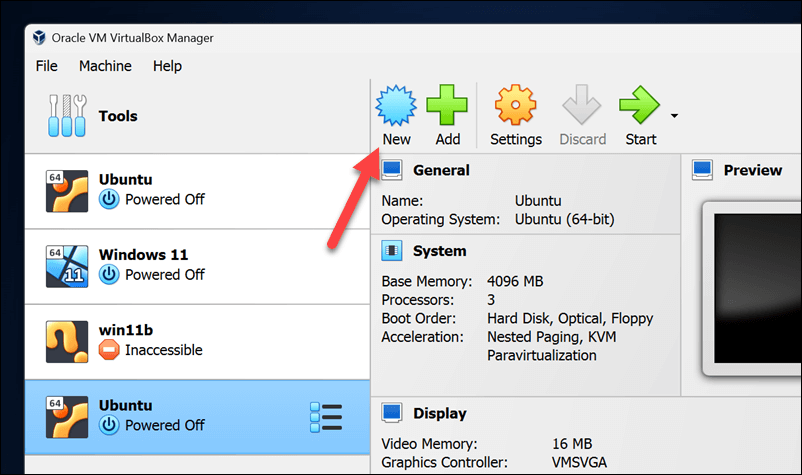
- Open VirtualBox and press the New button.
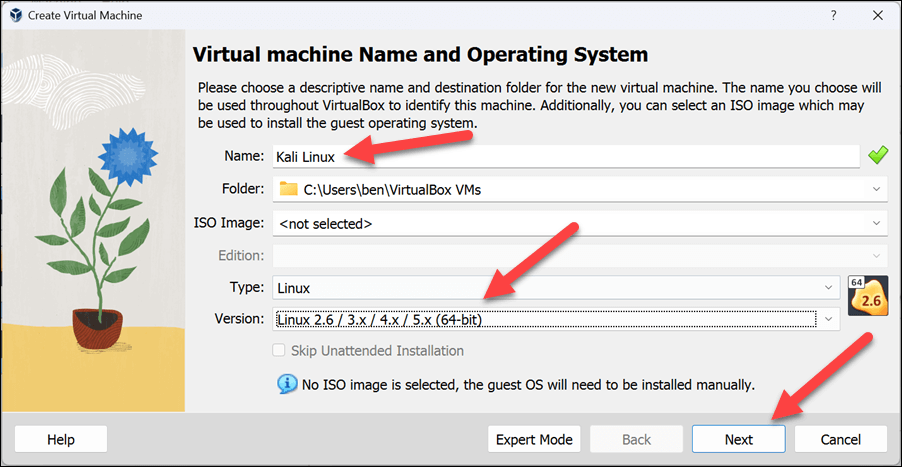
- In the Name and operating system menu, type a new name for your Kali Linux installation (eg. Kali Linux).
- Select Linux as the type and Linux 2.6 / 3.x / 4.x / 5.x (64-bit) as the version before pressing Next.
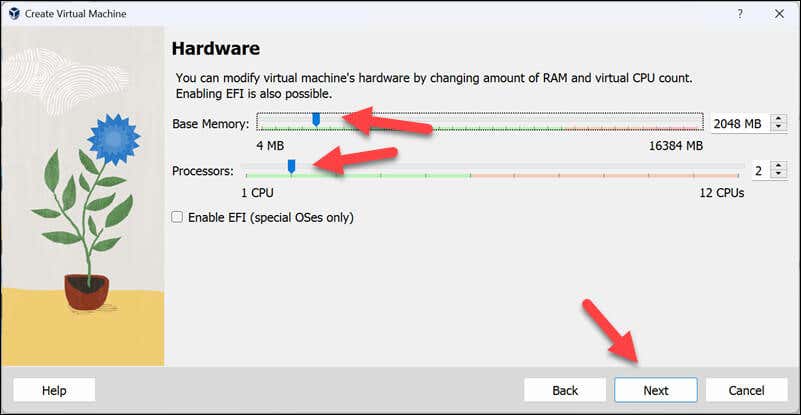
- In the Memory menu, select an appropriate amount of system memory to dedicate to your virtual machine. At a minimum, this should be around 2048MB (2GB) but, if you have more resources available to you, you can select more—just leave enough for Windows to run underneath without issue.
- Increase the processor count to a minimum of 2 (if your hardware allows for it).
- Press Next to proceed.
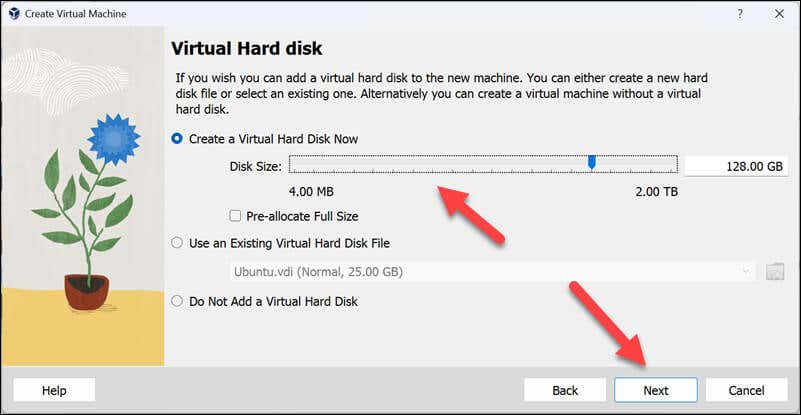
- In the Hard disk menu, choose the Create a virtual hard disk now option, select an appropriate size, and press Next to continue.
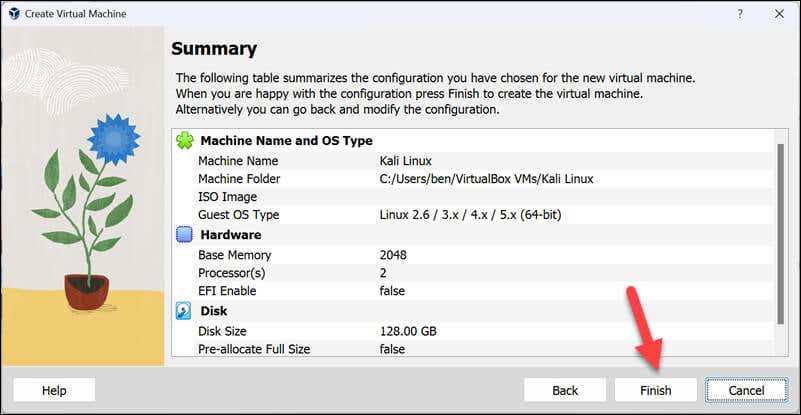
- Confirm the settings are correct before pressing Finish to create the virtual machine.
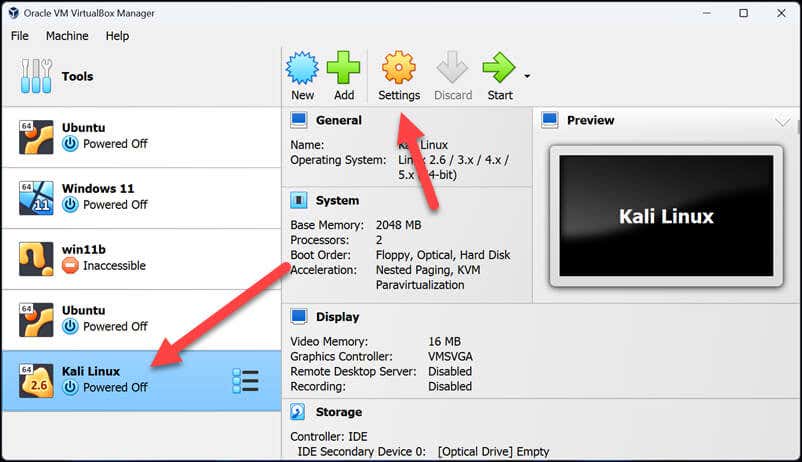
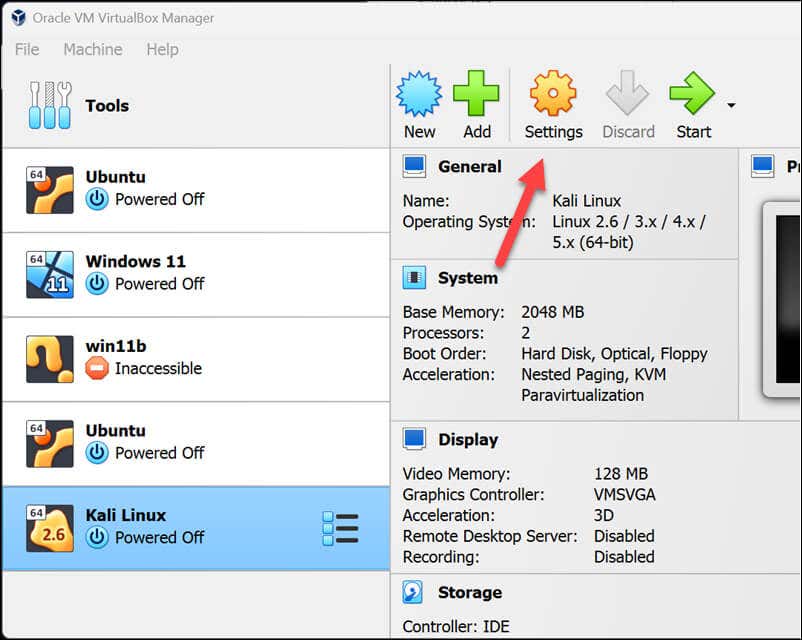
- Your virtual machine should be created at this point—select it and press Settings.
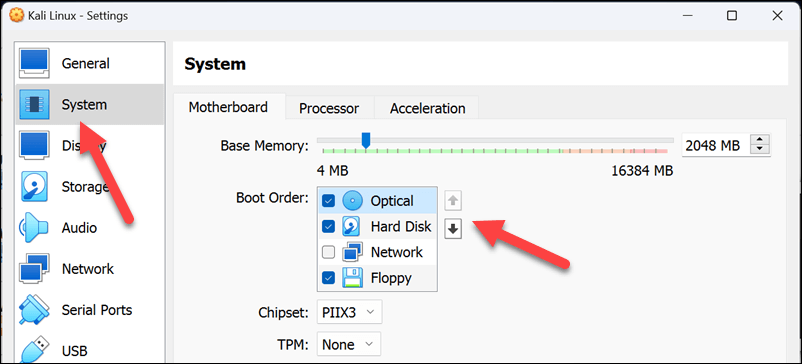
- In the Motherboard tab in the System menu, set the boot order to Optical first over Hard Disk.
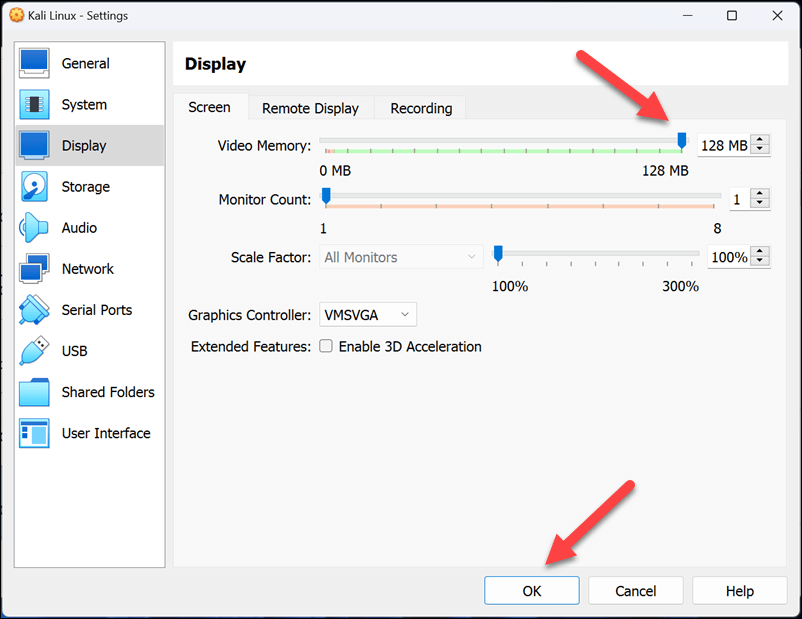
- Next, select Display and set your Video Memory option to a suitable level (128MB is recommended) and press the Enable 3D Acceleration checkbox.
- Press OK to save your virtual machine settings.
- Press Start to launch your Kali Linux virtual machine for the first time.
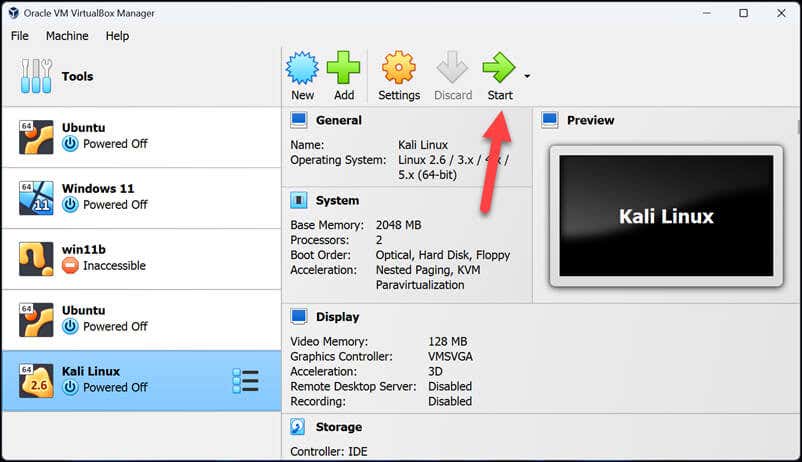
How to Install and Set Up Kali Linux in VirtualBox
At this point, you’ve successfully created and configured your new virtual machine in VirtualBox. You’ll now need to complete the installation process using these steps.
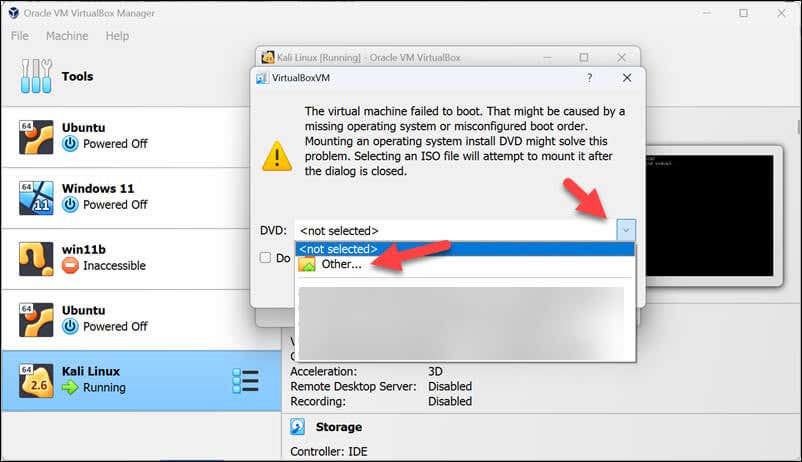
- When you start your Kali Linux machine, you’ll be prompted by VirtualBox to select an installation disk. You’ll need to select the ISO file you downloaded from the Kali Linux website here—press the arrow button > Other to do this.
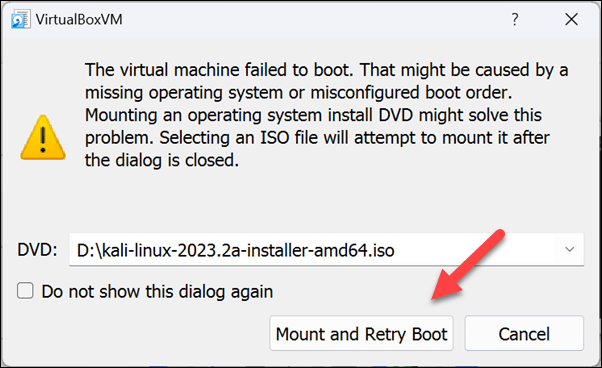
- Press Mount and Retry Boot to continue after this point.
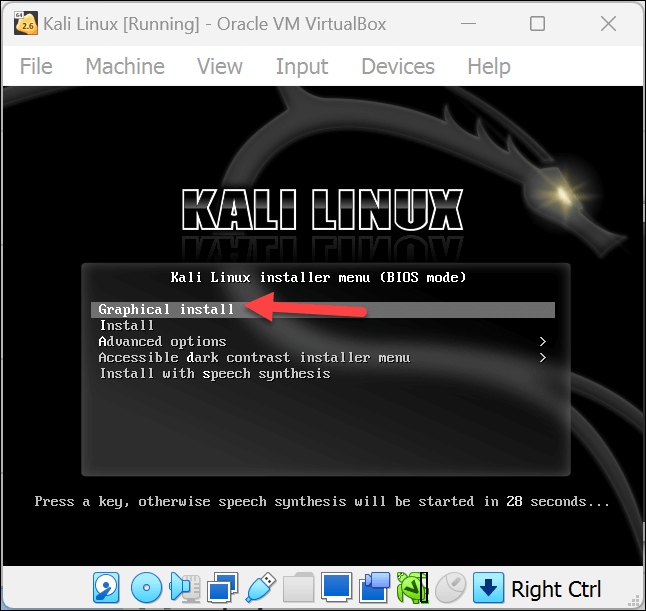
- After a few moments, you should be prompted to choose an installation method—most users should choose Graphical install and press the Enter key.
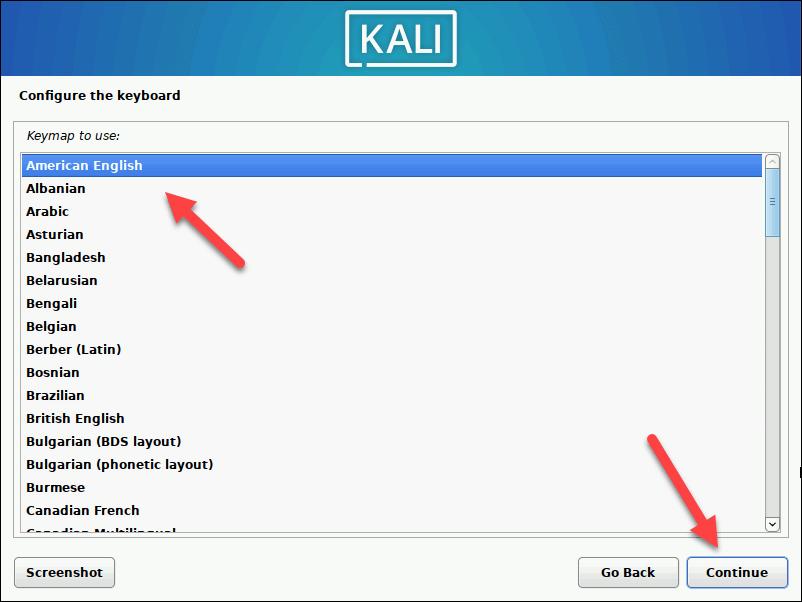
- Once the installation begins, you’ll be prompted to choose your language, location, and keyboard settings—select these options and press Continue at each menu.
- The installation will proceed—wait for it to continue. You may be prompted to confirm or configure your network settings (such as connecting to a Wi-Fi network) next. Follow the on-screen instructions to complete this process.
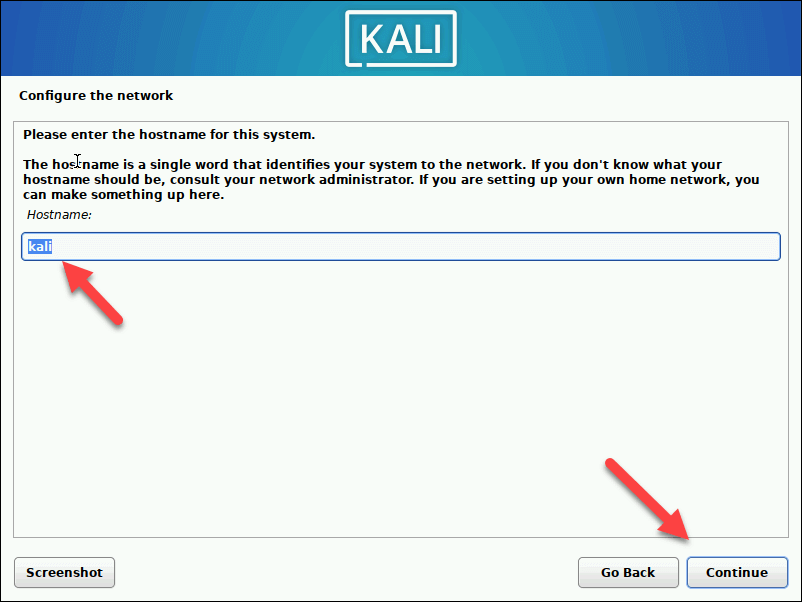
- Next, type a hostname (the name for your computer on your local network) in the text box before pressing Continue.
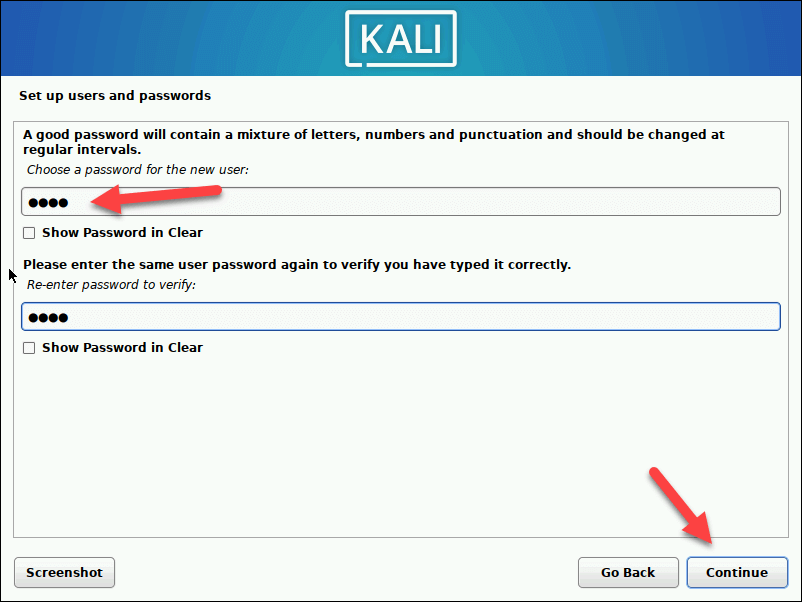
- When prompted, choose a username and password for your Kali Linux installation and press Continue at each menu.
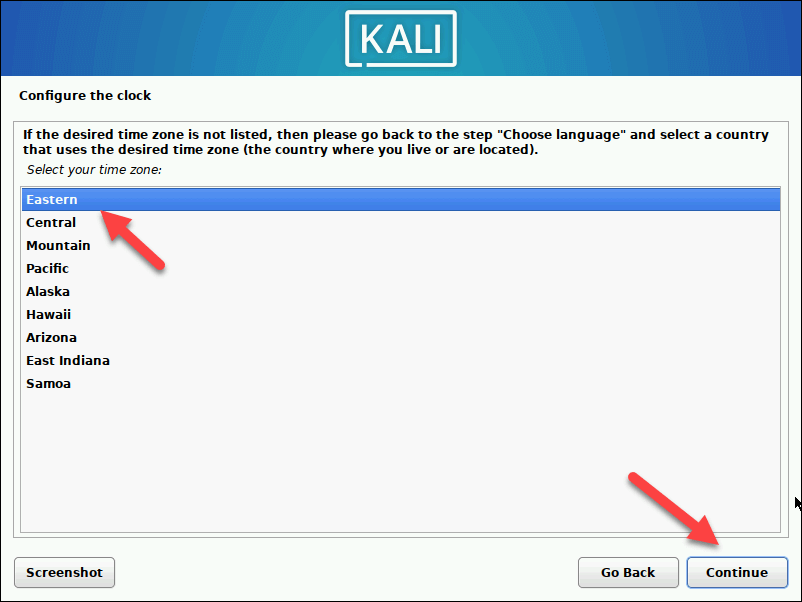
- Confirm your clock settings and press Continue.
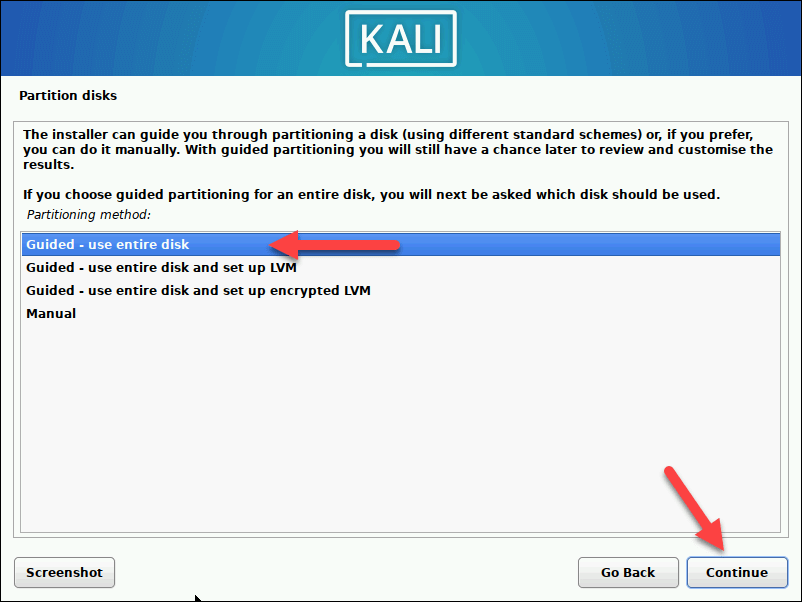
- At the Partition Disks menu, most users will need to select Guided – Use entire disk before pressing Continue through each menu. You can choose to separate your home, var, and tmp partitions but, for a virtual machine installation, it’s probably best to leave it all on a single disk as it’s all in a single file.
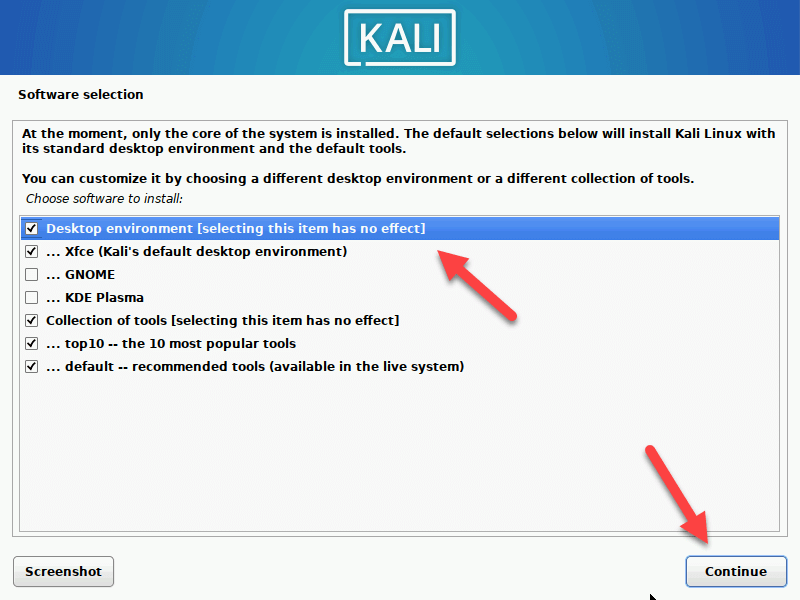
- During the installation, you’ll be prompted to choose what software to install. Make the changes, as preferred, then press Continue.
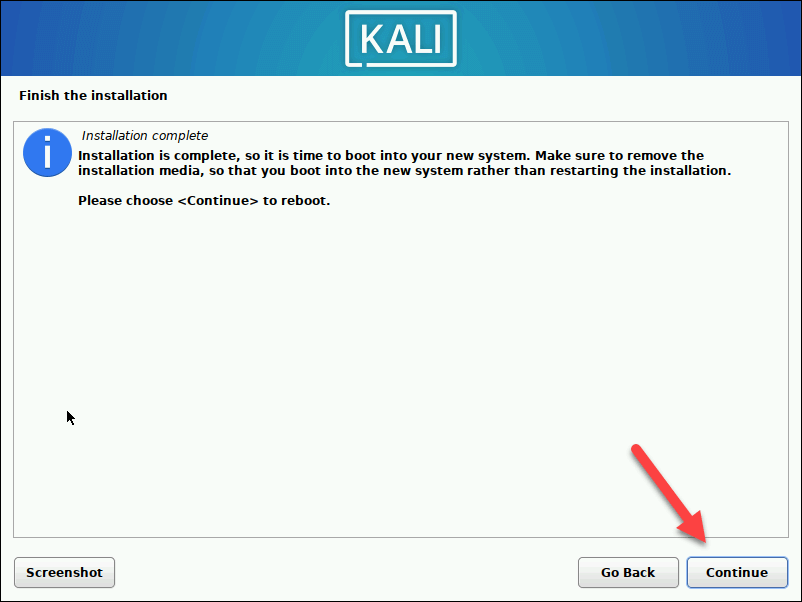
- Follow the on-screen instructions to confirm any other settings before pressing Continue at the Finish the installation menu.
- Your virtual machine will restart once the installation is complete. Make sure to exit the installation menu (if it boots into it) and confirm you can sign in afterwards, then shut down your virtual machine.
- At this point, you’ll need to return to your virtual machine settings to set the boot order to prioritise the hard drive over the virtual optical drive containing your installation ISO file—select the virtual machine and press Settings.
- In the Motherboard tab in the System menu, make sure to move the Hard Disk option to above the Optical option in the Boot Order options.
- Press OK to save.
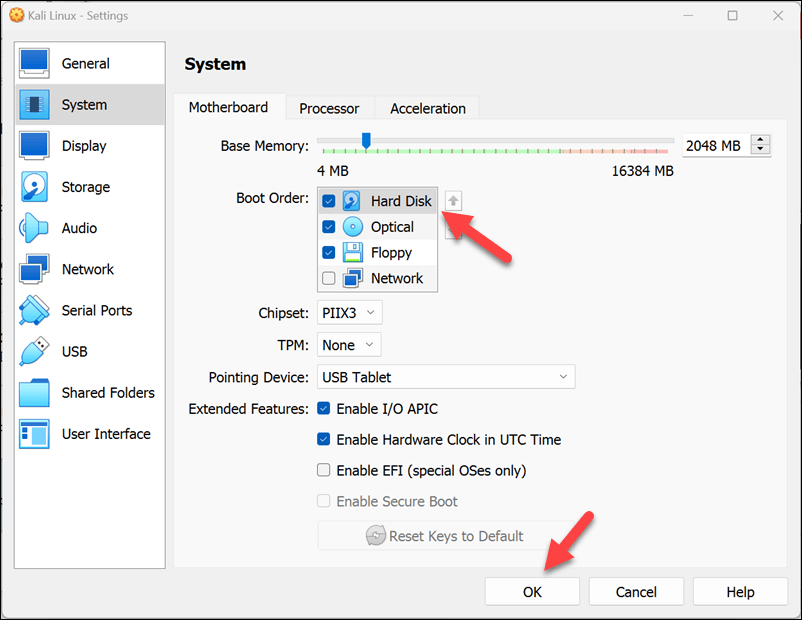
Kali Linux is now ready to use in VirtualBox. You can boot it up and begin using it immediately using the username and password you used to sign in.
Security Testing on Linux With VirtualBox
By using the steps above to install Kali Linux in VirtualBox on your Windows PC, you can take advantage of the full power that it has to test and secure any network. If you decide you want to uninstall VirtualBox at any point, you can do so from the Windows Settings menu.
Want to try a different method for testing new software? You can use Windows Sandbox to create a use-once Windows environment to test files or applications without putting your main windows installation at risk.
Source : https://ift.tt/AngjdXZ

Comments
Post a Comment