How to Insert Dates into Microsoft Word Documents
If you’re writing a document in Microsoft Word, you might want to include the date and time. For instance, writing a letter (by convention) usually requires inserting the date. You might want to add it for your requirements, showing when the document was created without relying on Word to do it for you.
Thankfully, there are several ways to insert dates into your Word documents. You can insert the current date as plain text, as a field that updates automatically, or as a drop-down list. You can also use a keyboard shortcut to insert the date and time quickly.
We’ll show you how to use these four methods to insert dates into Microsoft Word documents below.

How to Insert the Current Date as Plain Text in Microsoft Word
One of the simplest ways to insert the current date into your Word document is to use the Date & Time button. This will insert the date as plain text, which means it won’t change or update unless you manually edit it.
To use this method, follow these steps.
- Place your cursor where you want to insert the date in your Word document.
- Select the Insert tab on the ribbon bar, then press the Date & Time button in the Text group.
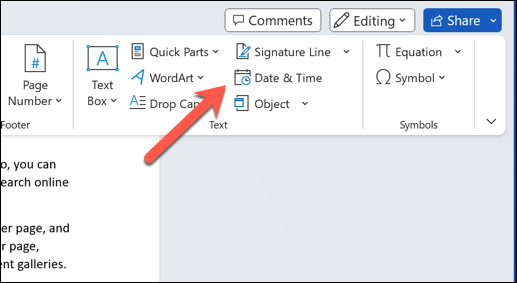
- The Date and Time box will appear with a list of date and time formats. Choose the format you want and click OK.

- The current date will be inserted as plain text at your cursor position.
How to Insert the Current Date as a Data Field that Updates Automatically in Word
If you want to insert the current date as a field that updates automatically whenever you open or print your document, you can use the same Date & Time command. You’ll need to change how it works, however.
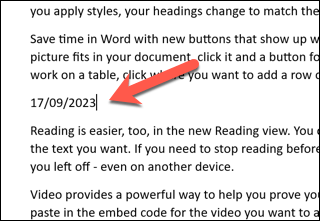
- To do this, open your Word document and place your blinking cursor where you want to insert the date or time value.
- Select Insert > Date & Time on the ribbon bar.

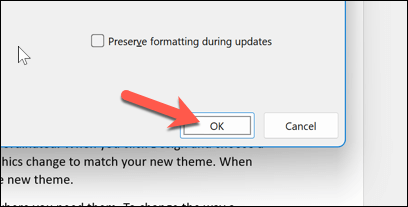
- The Date and Time box will open with a list of date and time formats—choose the format you want to use from the Available formats list.
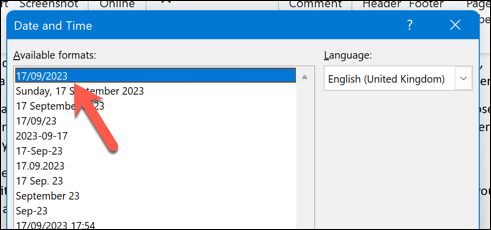
- Press the Update automatically checkbox at the bottom. This will ensure that the date value always updates.
- Press OK to save the changes.

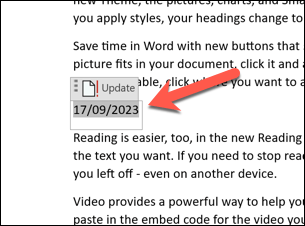
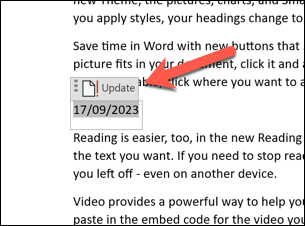
- The current date will be inserted as a custom data field at your cursor position with a gray background when you select it. Select the field and press the Update button to update the field manually.
Formatting and Customizing Date Fields in Word
After you insert the dates into your Word document, you can format and customize them according to your needs. For example, you might want to change the date format, language, or style.
To format and customize the dates in Word, follow these steps.
- Select the date that you want to format or customize. If it’s a field, you’ll see a gray background when you select it.
- Right-click the field and press Edit Field from the menu.

- In the Date formats box in the Field menu, edit the ISO date format to a format that you prefer.

- Alternatively, press the Field Codes button at the bottom left corner. You’ll see the field code for the date on the right, which looks something like this: { DATE @ “MMMM d, yyyy” }.

- To change the date format, edit the text inside the quotation marks. You can use different symbols and letters to represent different parts of the date. For example, you can use “d” for day, “M” for month, “y” for year, etc., which reflects typical ISO date time formats.

- After editing the date field, press OK to close the dialog box.
- Select the field again and select the Update button. The date will update according to the changes you’ve made.
How to Insert a Date in Word Using a Date Picker Drop-Down
Another way to insert a date into your Word document is to use a date picker drop-down field. This is a field type that allows you to choose a date from a calendar without relying on complex field codes.
This is useful if you want to create forms or templates that require inputting dates, for instance.
- To do this, place your blinking cursor on the document where you want to insert your date.
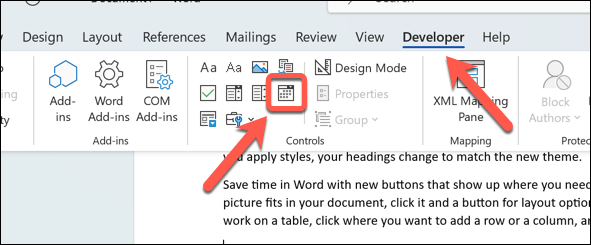
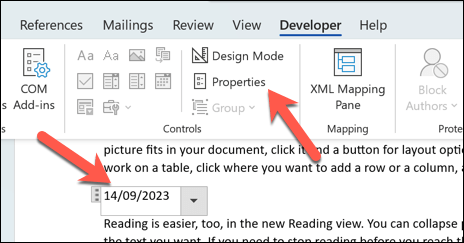
- Check that the Developer tab is visible on the ribbon bar. If it isn’t, you can enable it by pressing File > Options > Customize Ribbon and enabling the Developer checkbox before saving the changes.

- Next, press the Developer tab and select Date Picker Content Control in the Controls group.
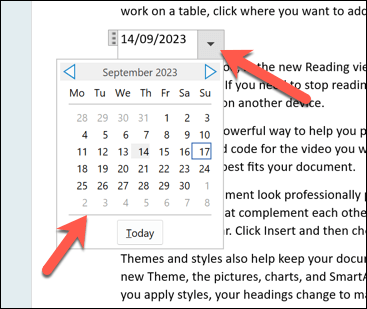
- A date picker drop-down field will be inserted at your cursor position. You can click on it to choose a date from a calendar.

- The date will be applied immediately. To change it again, select the downwards arrow next to the field to show the calendar again, then choose a new date.
- To change the format or color of the field, select the field first, then press the Properties button in the Controls group to make your changes.
How to Insert the Date and Time Using a Keyboard Shortcut in Word
You can also use keyboard shortcuts in Word to help you quickly insert the date or time into your Word document. The information will be inserted directly where your blinking cursor is positioned—no extra steps are required.
- To do this, open your Word document and place your blinking cursor where you want the date and time to appear.
- Next, press Alt + Shift + D on your keyboard. This will insert the current date in the format of Month, Day, Year (for example, January 12, 2023).
- Alternatively, press Alt + Shift + T on your keyboard. This will insert the current time in the format of Hour:Minute AM/PM (for example, 3:26 PM).
You can combine these shortcuts to insert the date and time simultaneously. Make sure to leave a gap between them, however.
Using the Date and Time in Word Documents
Thanks to the steps above, you can quickly insert dates into Microsoft Word documents. Depending on your preferences, the information can be static or ready to change whenever you open your document.
Remember, however, that features like the Date Picker won’t work if you open your Word document outside of Word in a tool like Google Docs. If you want to convert your Word document, you’ll need to insert your date and time as plain text to ensure that it converts properly.
Source : https://ift.tt/I7i43Cm


Comments
Post a Comment