Top 7 Ways to Fix Windows Install Error 0x80070103
Windows displays the “Install error – 0x80070103” when it encounters issues installing driver updates. This usually happens when Windows attempts to install an incompatible or existing driver update on your computer. Low storage space and corrupt system files can also trigger the Windows Update install error 0x80070103.
You can eliminate this error code by rebooting your PC, deleting temporary files, or running the Windows Update troubleshooter. Take the troubleshooting steps below to eliminate the underlying problem causing the 0x80070103 Windows Update error.
1. Run Windows Update Troubleshooter
The Update Troubleshooter can diagnose and fix issues preventing Windows from downloading/installing updates. Connect your computer to the internet and follow the steps below to run the Windows Update troubleshooter.
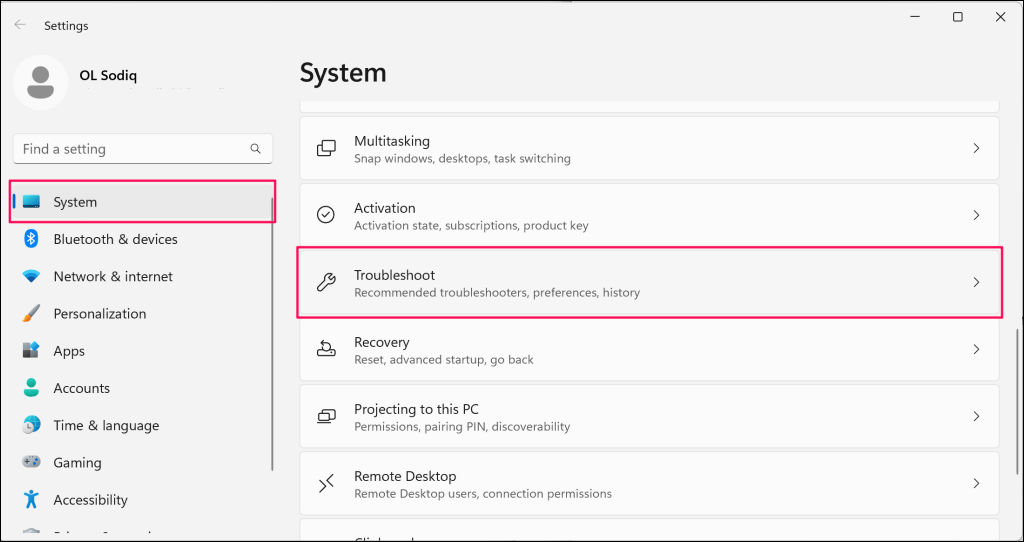
- Launch the Windows Settings app (Windows key + I), open the System tab on the sidebar, and select Troubleshooting.
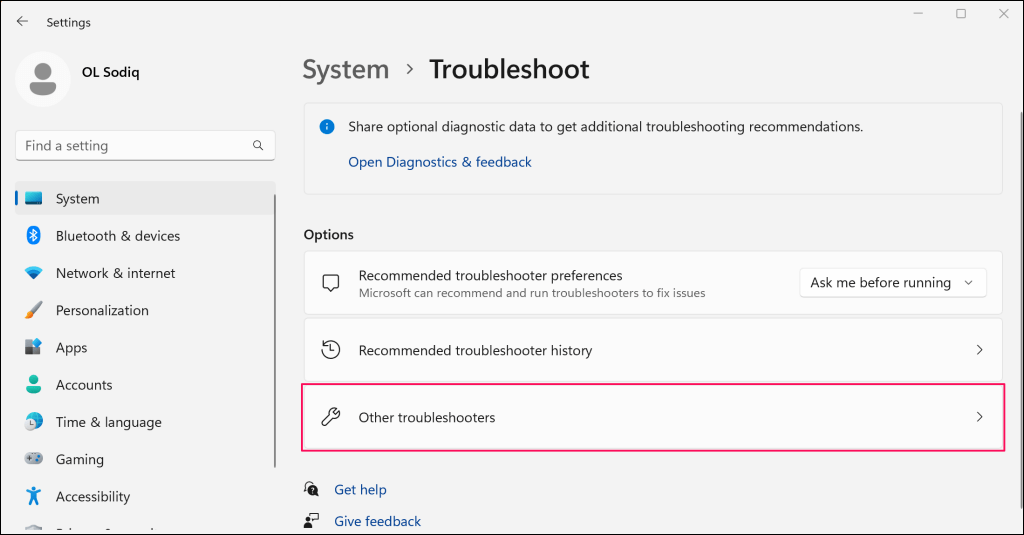
- Select Other troubleshooters.
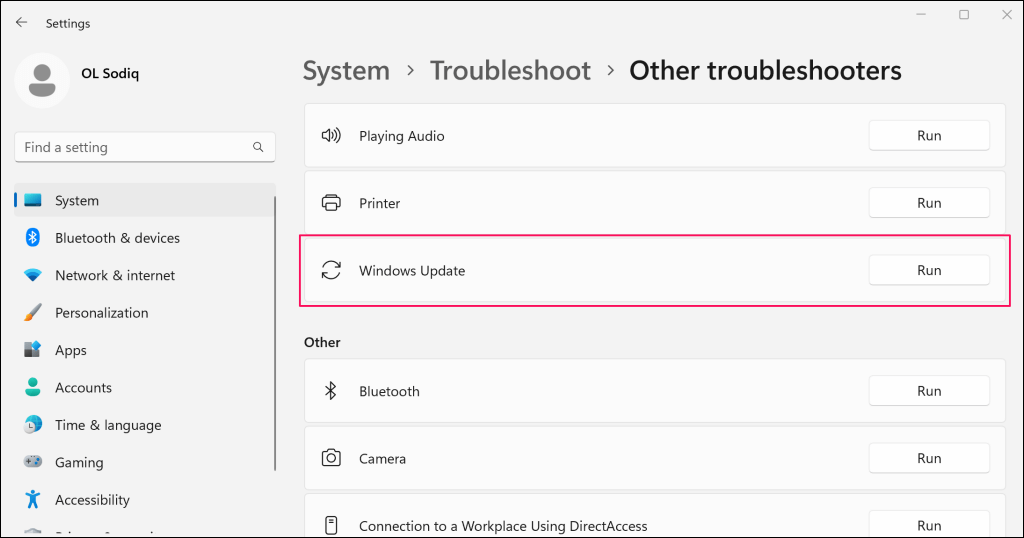
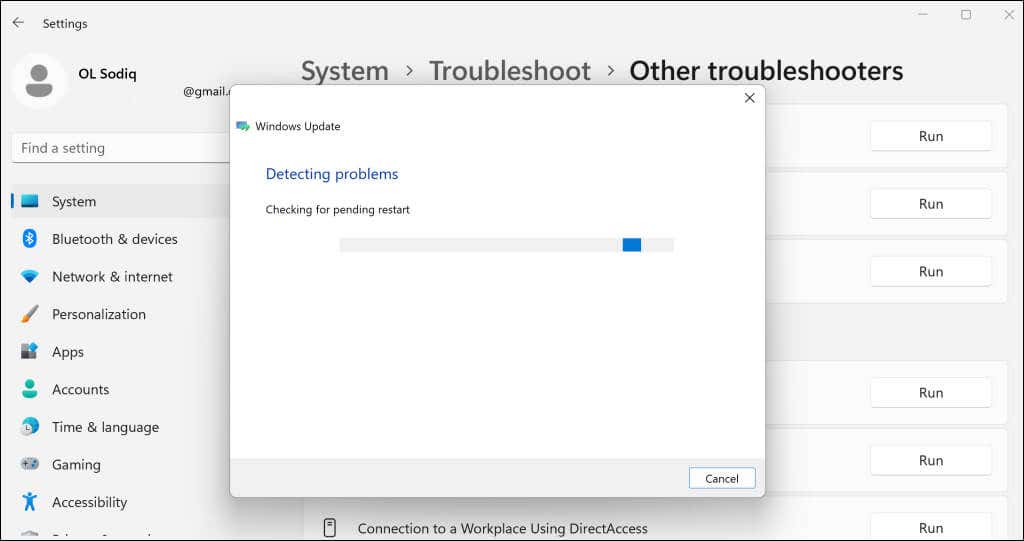
- Select the Run button next to ”Windows Update.”
- Wait while the Windows Update troubleshooter diagnoses your computer for issues causing the Windows update error.
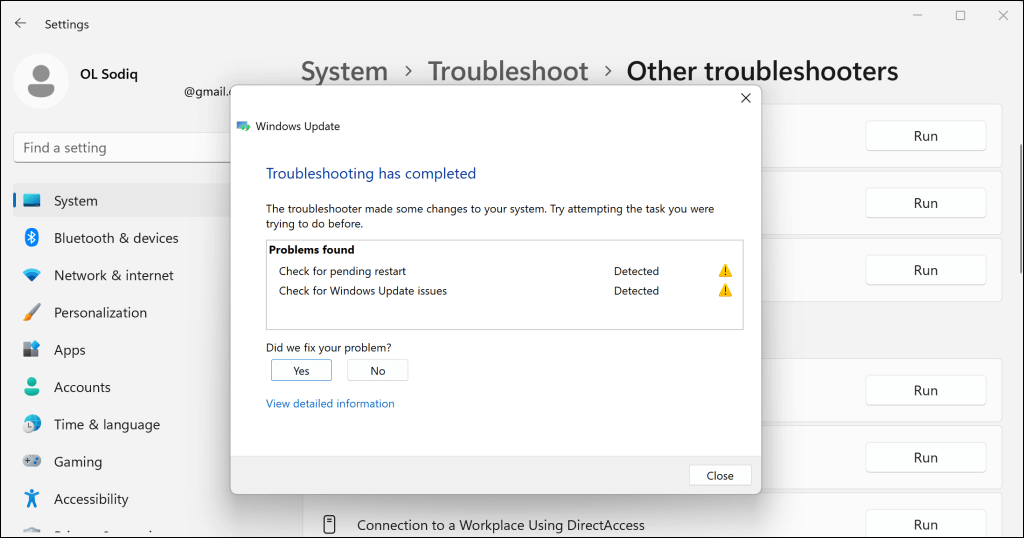
The troubleshooter automatically repairs some issues it detects. Try updating your computer again when you see a “Troubleshooting has completed” success message.
2. Reboot Your Computer
Windows might fail to update drivers that are currently in use or operation. Close all applications, restart your computer, and check if Windows installs the driver update without issue.
3. Delete Temporary Files
You might encounter the install error 0x80070103 if your computer doesn’t have enough storage for temporary files. Delete some temporary files to free up space to allow for smooth installation of Windows driver updates.
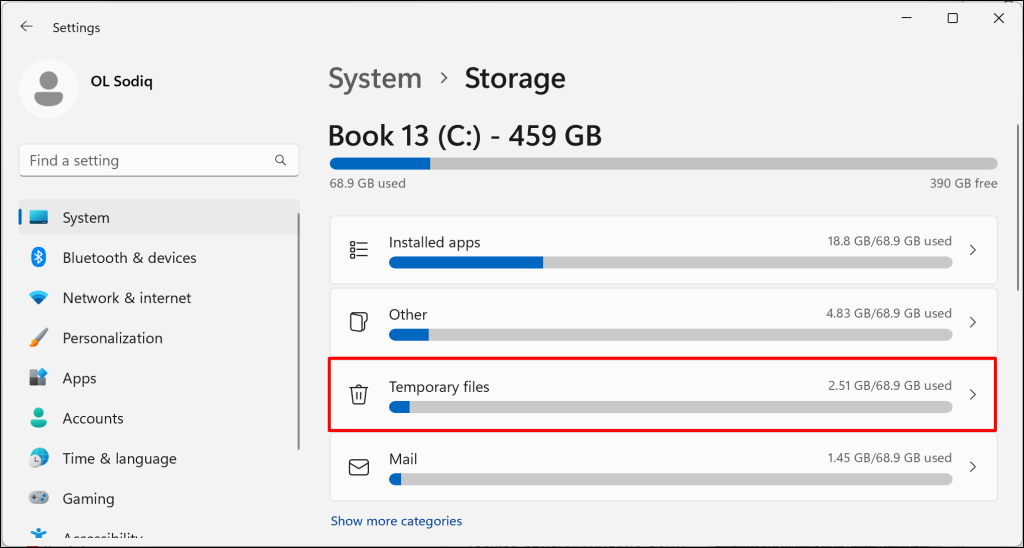
Open the Windows Settings app, head to System > Storage, and Temporary files.
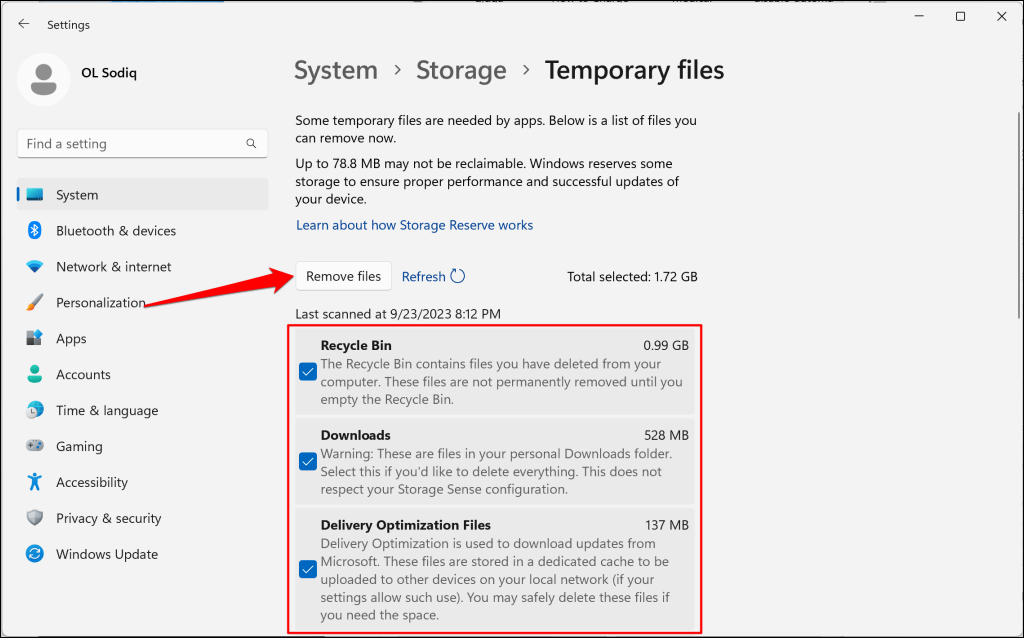
Choose the temporary files you want to delete and select the Remove files button.
You can also delete temporary files using File Explorer or Disk Cleanup tool. See our tutorial on deleting temporary files in Windows for more information.
4. Restart the Windows Update Service
The Windows Update service helps Windows devices detect, download, and install software and app updates. Restarting the service can resolve software update installation issues.
Follow the steps below to restart the Windows Update on Windows 10 and Windows 11 computers.
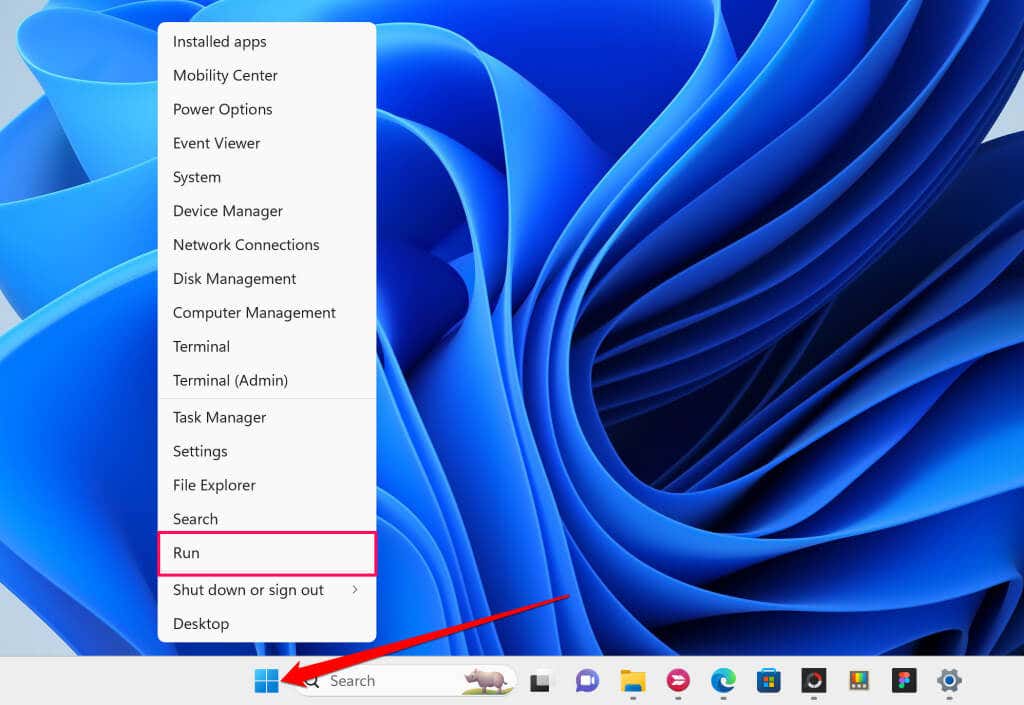
- Press the Windows key + R key to launch the Windows Run box. Alternatively, right-click the Windows logo on the taskbar and select Run.
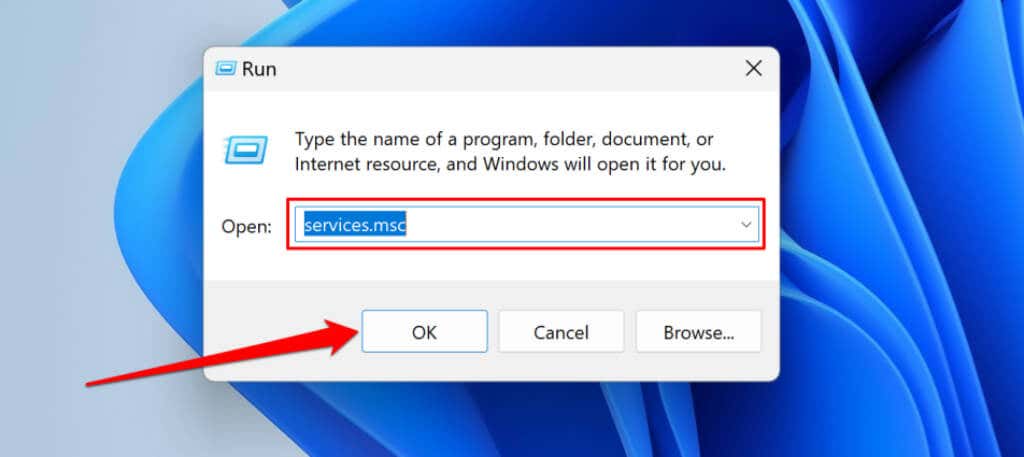
- Type or paste services.msc in the dialog box and select OK to launch the Windows Services Manager.
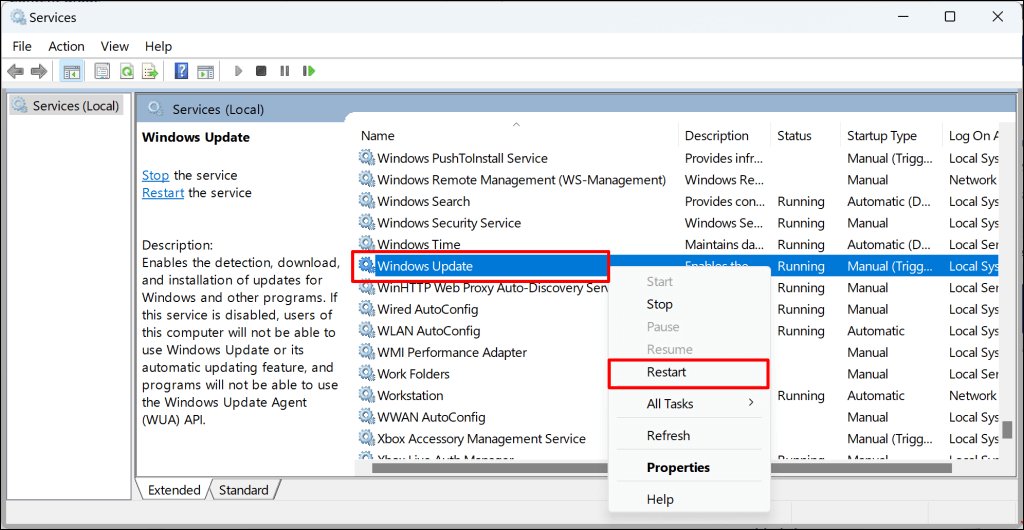
- Right-click the Windows Update service and select Restart.
5. Run the System File Checker
Corrupt system files can prevent your computer from installing Windows updates. Use the System File Checker (SFC) tool to find and repair your PC’s missing or corrupt system files.
Connect your Windows computer to the internet and follow the steps below to run an SFC scan.
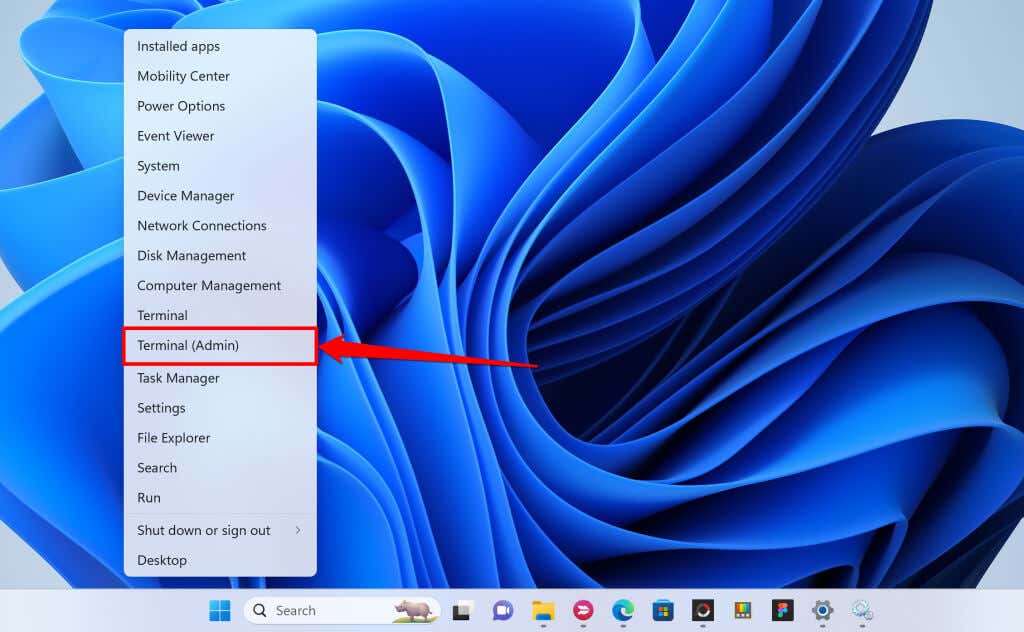
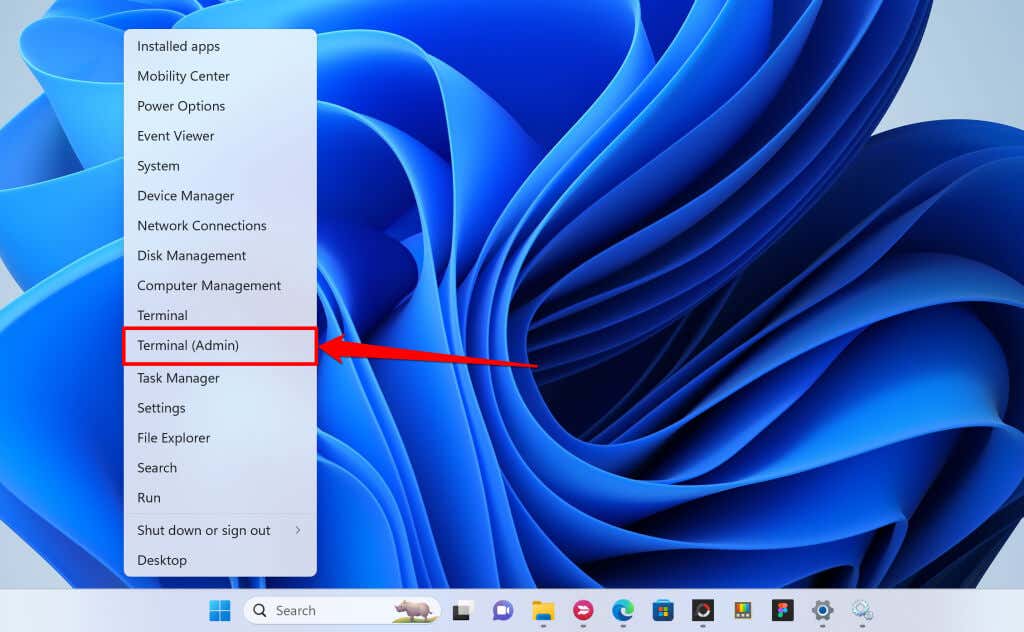
- Right-click the Windows logo on the taskbar or press the Windows key + X and select Terminal (Admin).
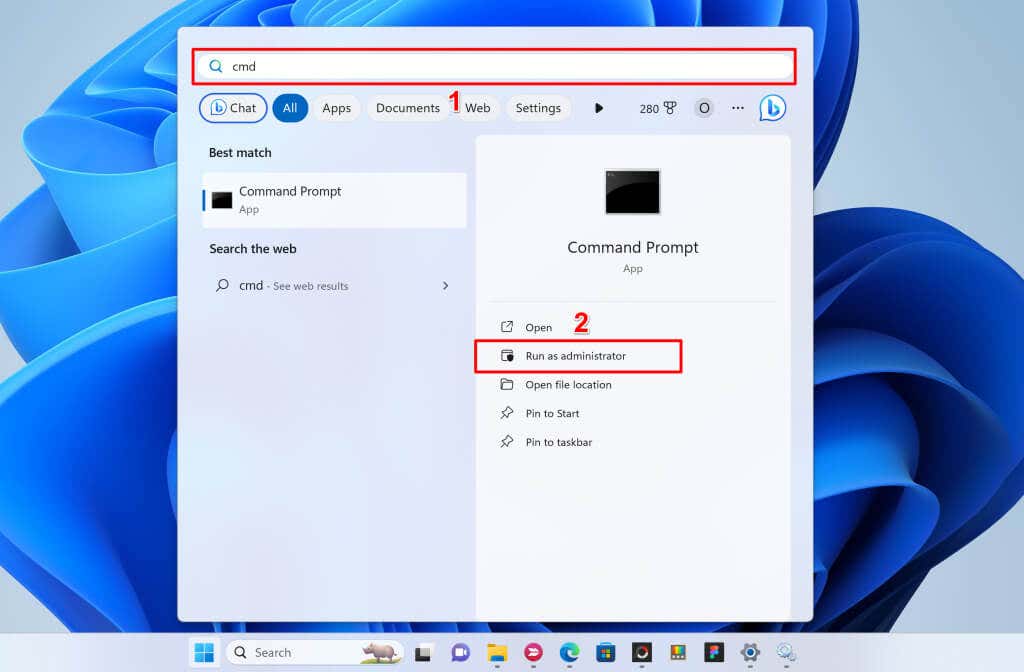
Alternatively, open the Start menu, type cmd in the search bar, and select Run as administrator.
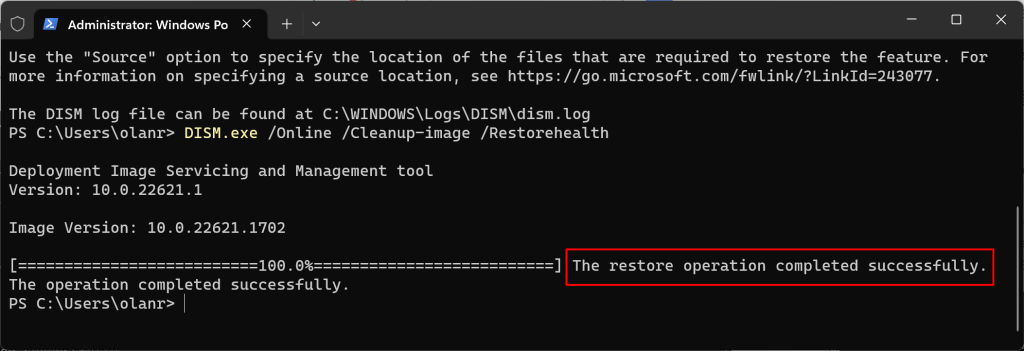
- If your PC runs Windows 10, Windows 8.1, or Windows 8, type or paste DISM.exe /Online /Cleanup-image /Restorehealth in the terminal and press Enter. Skip this command and proceed to step #3 if you have a Windows 11 PC.
This command prompts Windows to download replacement files for missing or corrupt system files. Run the next command when you see a “The operation completed successfully” message.
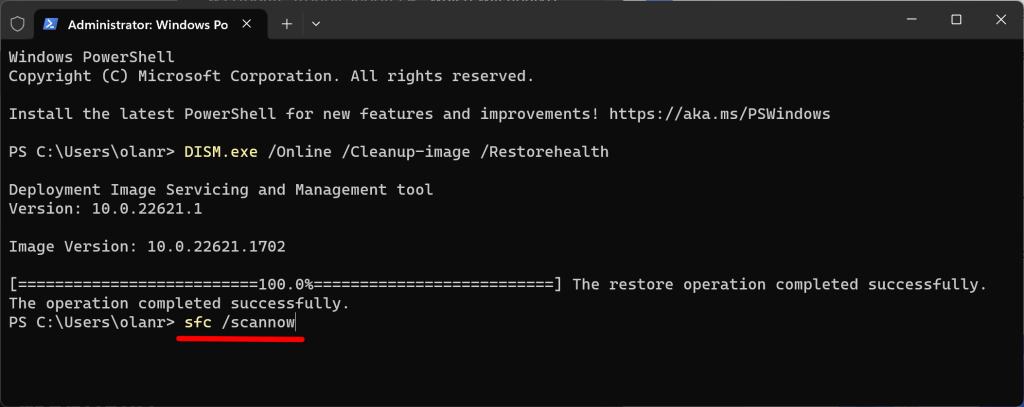
- Type or paste sfc /scannow in the terminal and press Enter.
The command scans your computer and replaces corrupt system files with fresh copies.
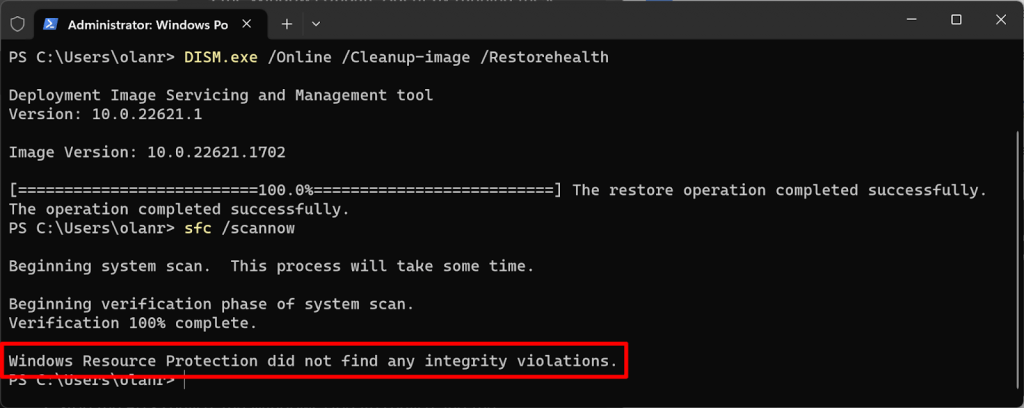
Your computer has no missing/corrupt system file if you see a “Windows Resource Protection did not find any integrity violations.” success message.
You’ll get a “Windows Resource Protection found corrupt files and successfully repaired them.” message if SFC detects and replaces system files.
Close the Command Prompt, restart your computer, and check if running SFC resolves the update issue.
6. Delete the Software Distribution Folder
The Software Distribution folder houses temporary files required to install new updates on Windows computers. Cleaning up this folder is a surefire troubleshooting fix for Windows Update errors and issues. Deleting the Software Distribution folder is safe, so you have nothing to worry about.
Windows re-downloads the necessary files to the Software Distribution folder, so you have nothing to worry about. Connect your computer to the internet to let Windows download files needed to repopulate the folder.
You should manually reset the Windows Update components and stop all system services that download/install Windows Updates before deleting the Software Distribution folder.
- Press the Windows key + X and select Terminal (Admin).
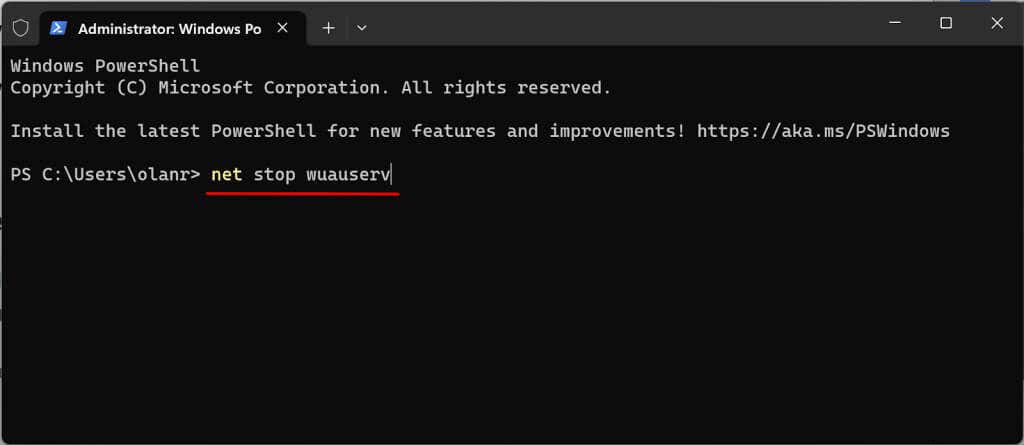
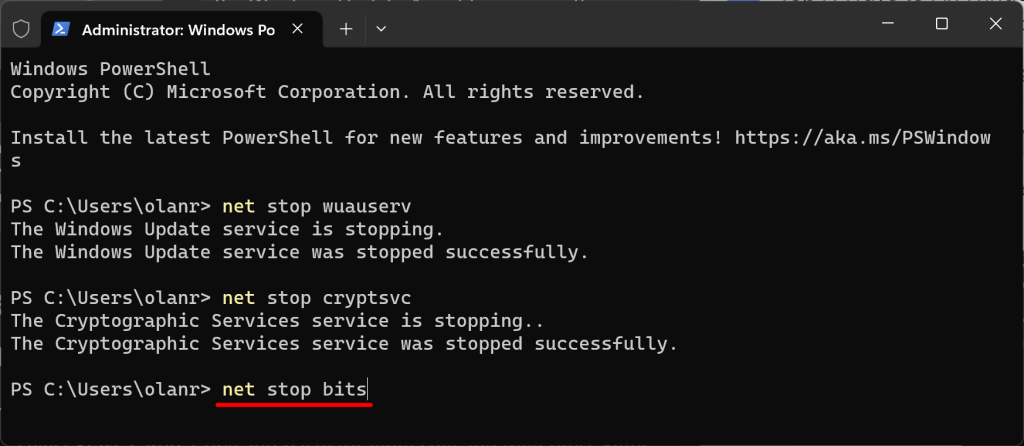
- Paste net stop wuauserv in the console and press Enter. This command stops the Windows Update service on your computer.
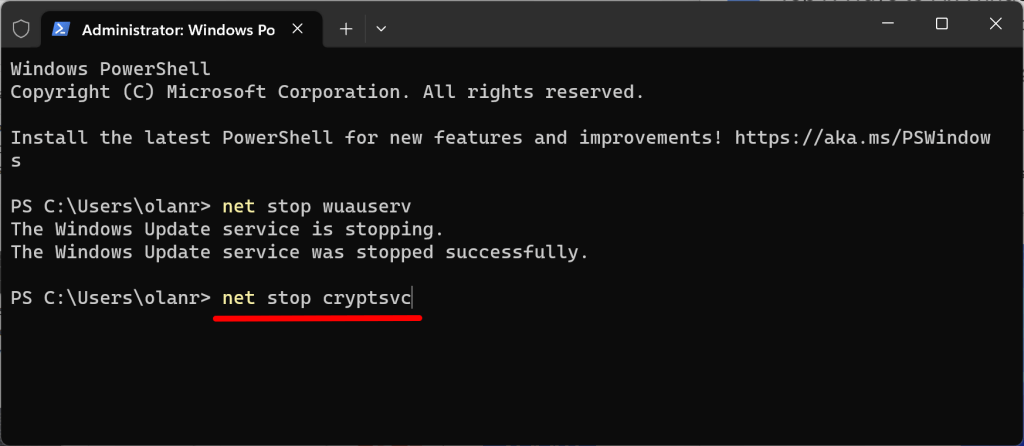
Run the next command when you see a “The Windows Update service was stopped successfully” message.
- Next, paste net stop cryptsvc in the following line and press Enter.
Run the next command when you see a “The Cryptoservice Services was stopped successfully message.”
- Paste net stop bits in the following line and press Enter.
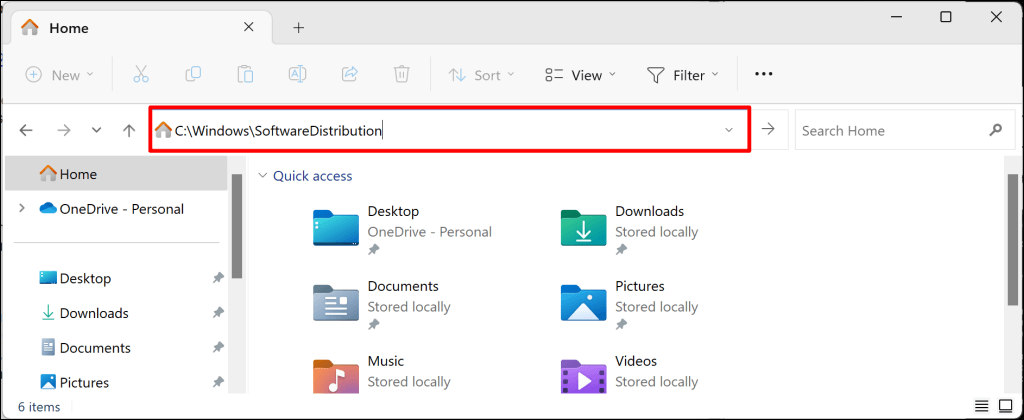
- The next step is to delete the content of the Software Distribution folder. Open the Windows File Explorer, paste C:\Windows\SoftwareDistribution in the navigation pane, and press Enter.
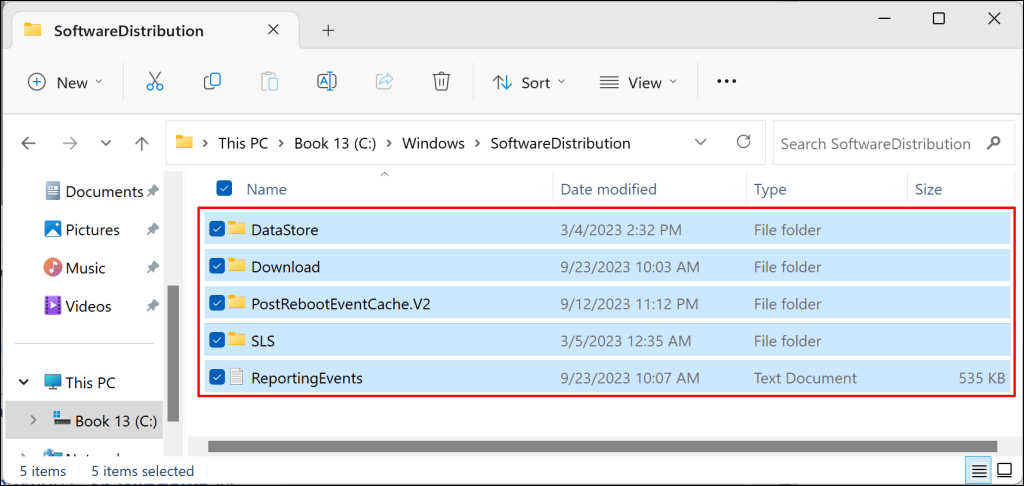
- Press Ctrl + A to select all items in the folder. Delete the files or move them to a different location on your PC.
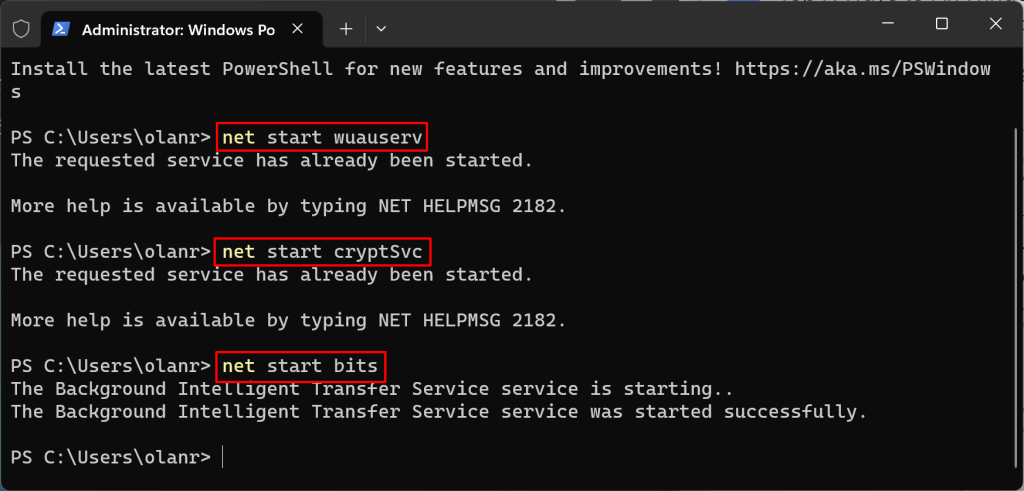
- Return to the Terminal and run the following commands to restart the services you stopped earlier (in steps #2, #3, and #4).
net start wuauserv
net start cryptSvc
net start bits
Try reinstalling the update and check if deleting the Software Distribution folder stops the error.
7. Stop Automatic Driver Updates
Preventing Windows from automatically downloading and installing drivers from Windows Update can resolve the 0x80070103 update error.
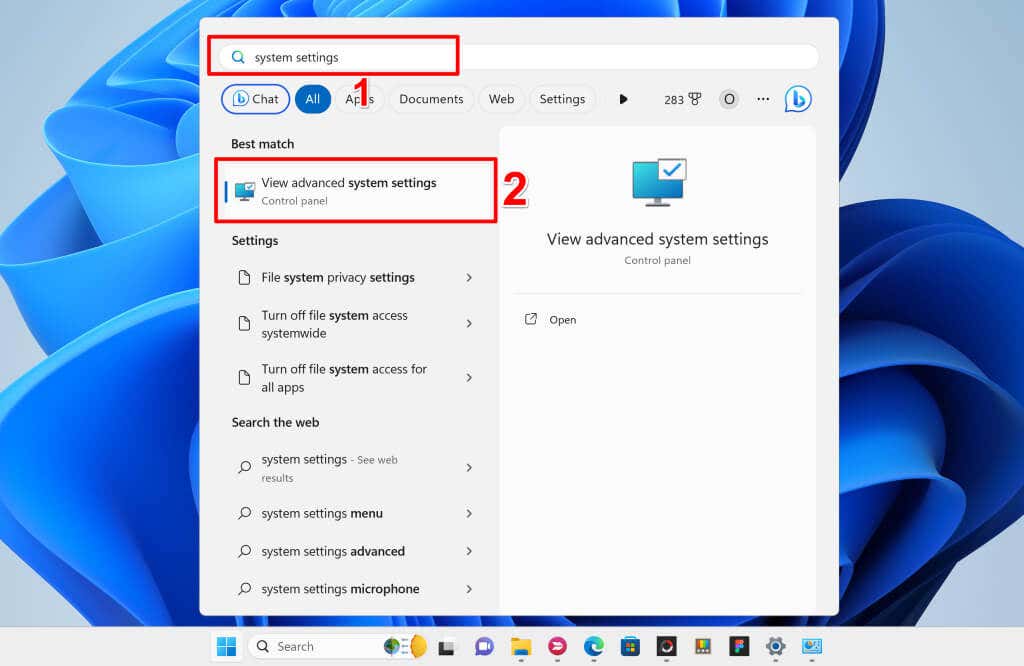
- Press the Windows key, type system settings in the search box, and select View advanced system settings.
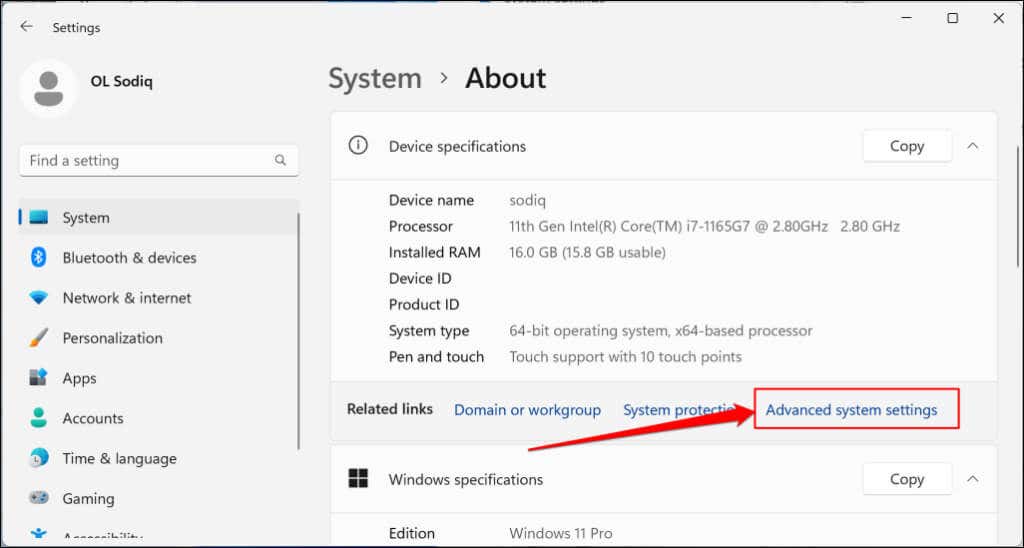
Alternatively, head to Settings > System > About, expand the Device specifications section, and select Advanced system settings.
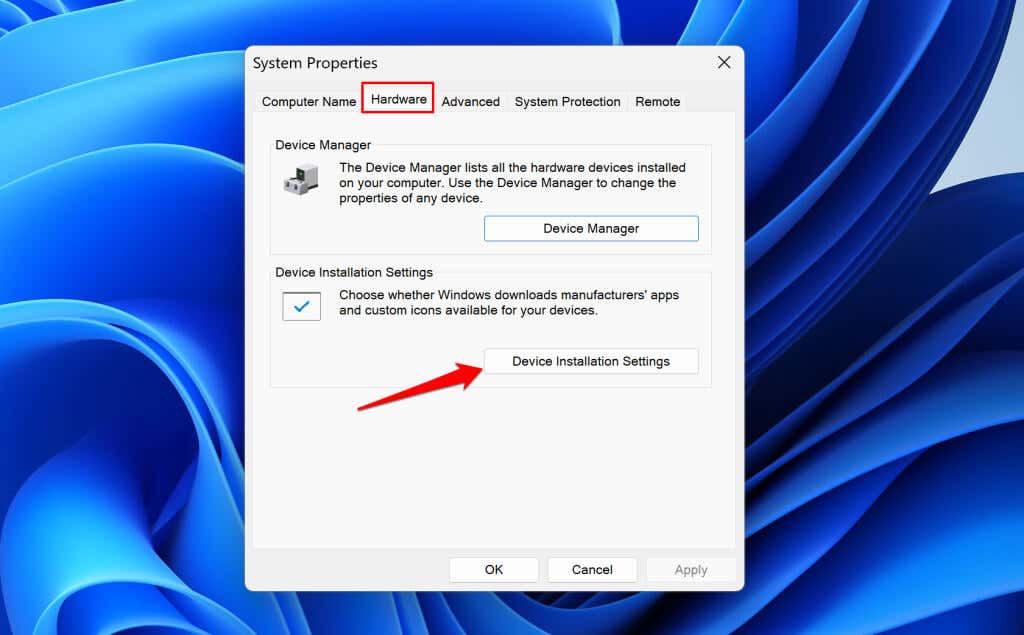
- Open the Hardware tab and select the Device Installation Settings button.
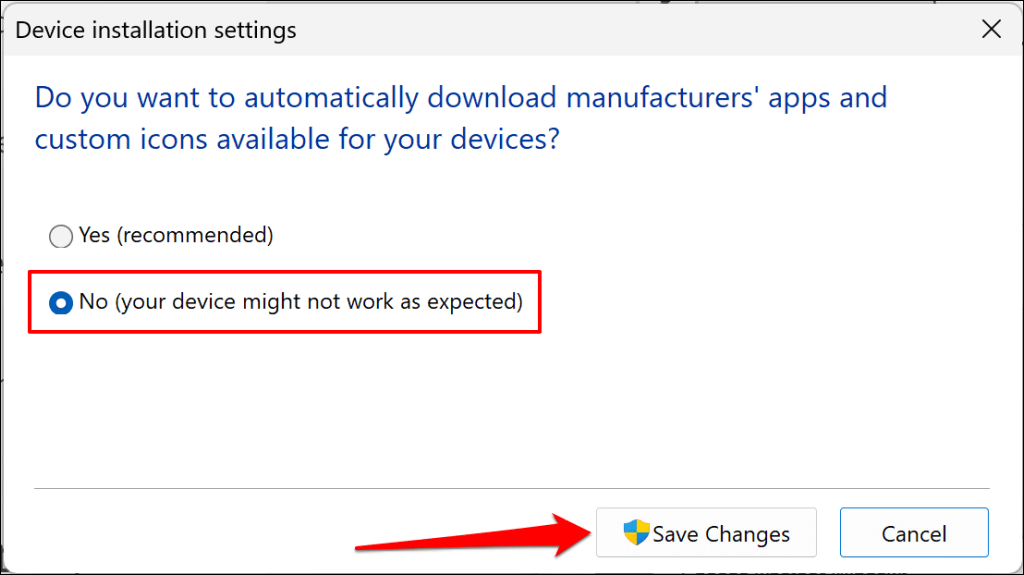
- Choose the No option and select the Save Changes button.
That’ll stop Windows from applying updates to drivers installed on your computer. Restart Windows and check if disabling automatic driver updates dismisses the 0x80070103 error.
Last Resort: Reset Windows
Factory reset your computer’s operating system if the error persists after trying the troubleshooting fixes above. Back up your files or choose the “Keep my files” reset option to avoid losing important files or documents. Refer to our tutorial on factory resetting Windows 11 for step-by-step instructions.
Source : Top 7 Ways to Fix Windows Install Error 0x80070103

Comments
Post a Comment