How to Rollback or Uninstall NVIDIA Drivers in Windows 11
Keeping your video drivers up-to-date is crucial for optimizing performance in Windows 11. But there are also rare instances where an update might create graphical anomalies in applications, produce choppy FPS (frames per second) in games, or affect the operating system’s stability.
If a driver update to your NVIDIA graphics card is causing problems, you should revert to an earlier version during routine troubleshooting. This tutorial will show you how to roll back or uninstall NVIDIA drivers in Microsoft Windows.
Rollback NVIDIA Driver in Device Manager
Suppose you began experiencing issues immediately after updating your NVIDIA video card drivers. In that case, you can use the Device Manager in Windows 11 to revert to the driver version you were on before. Here’s how:
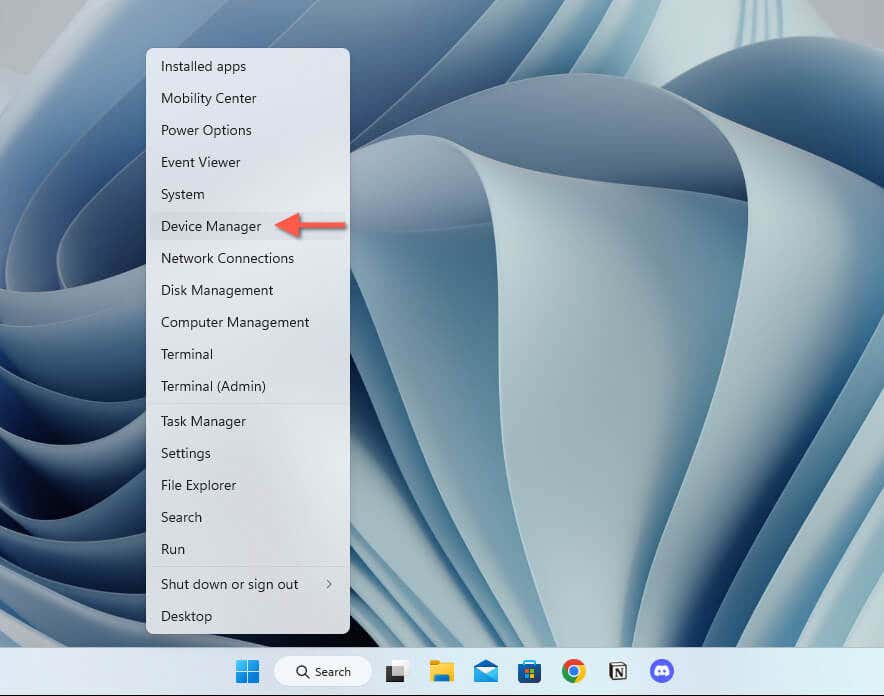
- Right-click the Start button and open Device Manager.
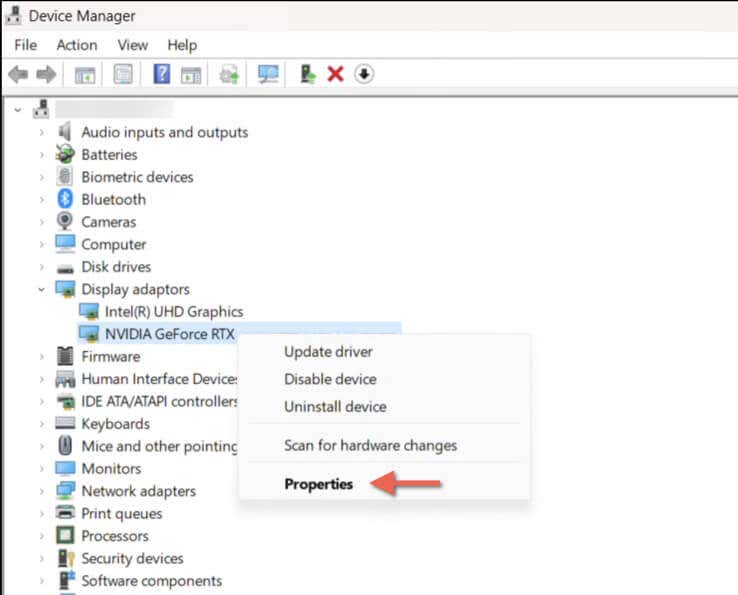
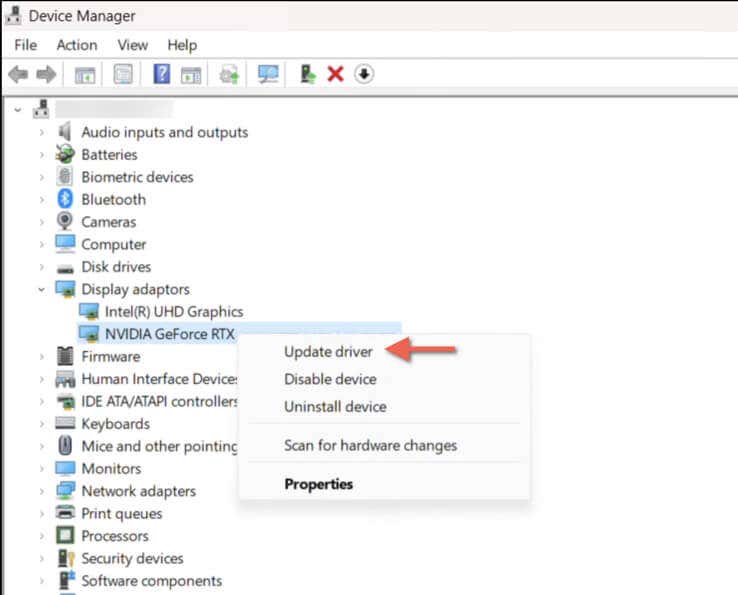
- Expand the Display adapters section.
- Right-click your NVIDIA GPU—e.g., NVIDIA GeForce RTX 3090—and select Properties.
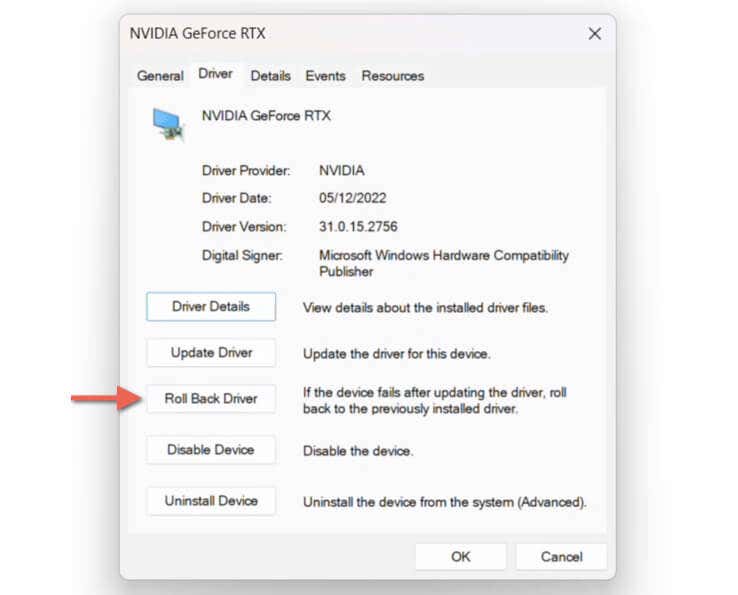
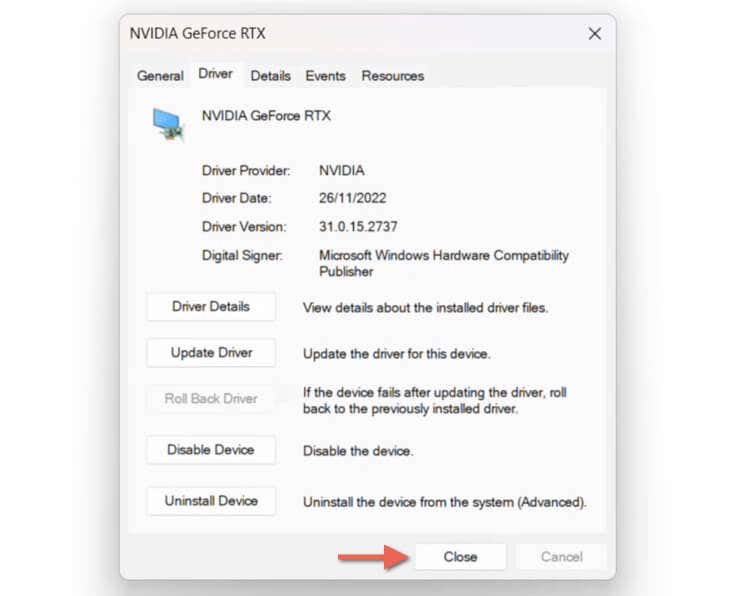
- Go to the Driver tab.
- Check the Driver Version field for the current driver version (optional).
- Select the Roll Back Driver button.
Note: If the Roll Back option appears grayed out, it means there’s no previous driver version to go back to. For example, it could be because you deleted older versions during the last driver update.
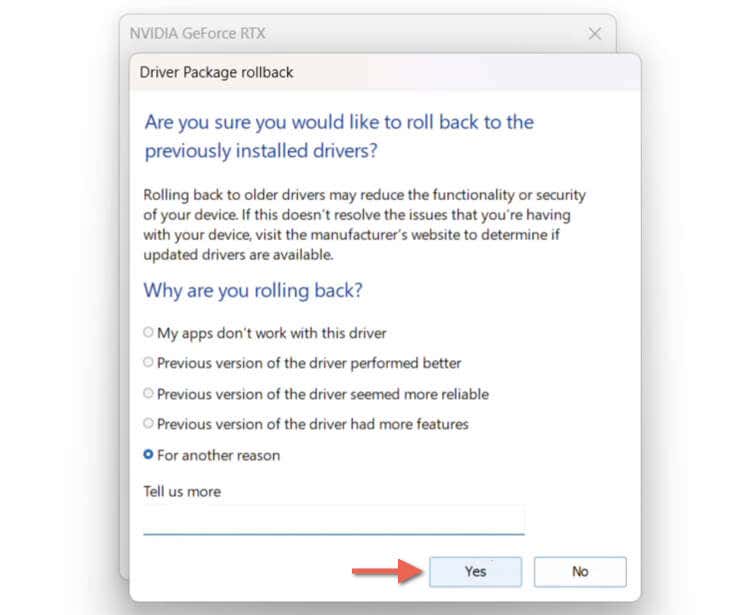
- Pick a reason for rolling back the driver—e.g., Previous version of the driver performed better—and select Yes.
- Wait until Windows finishes rolling back the new driver—the Driver Version field should automatically update and reveal an older version number afterward.
- Select Close.
- Exit the Device Manager and restart Windows.
To update your NVIDIA graphics driver later, open the GeForce Experience app, switch to the Drivers tab, and select Download next to the latest version. Or, download and install the newest driver from NVIDIA’s GeForce Drivers page.
Rollback to a Specific NVIDIA Driver Version in Device Manager
If you’ve updated your NVIDIA graphics card multiple times over a short period, you should be able to use the Device Manager to pick the exact older driver version to roll back to. The procedure involves a different set of steps:
- Open the Device Manager.
- Expand Display adapters, right-click your NVIDIA graphics card, and select Update driver.
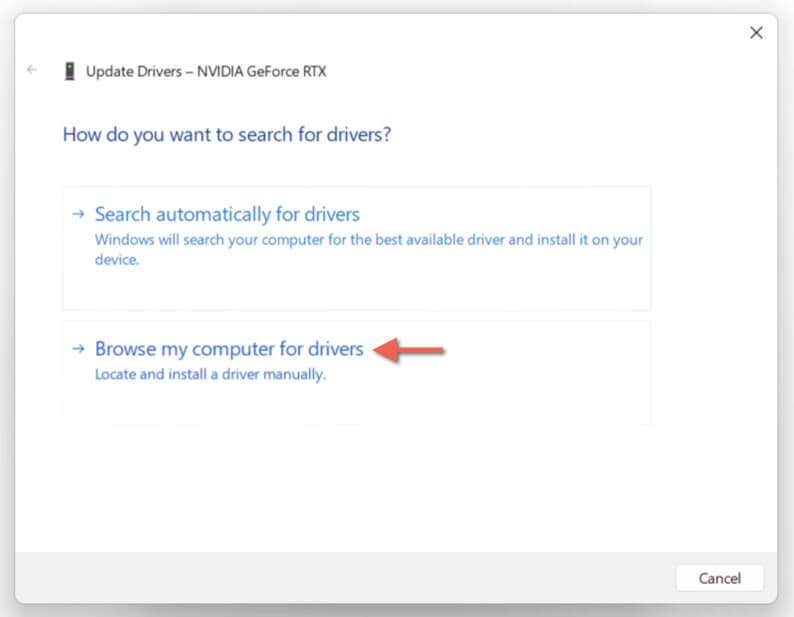
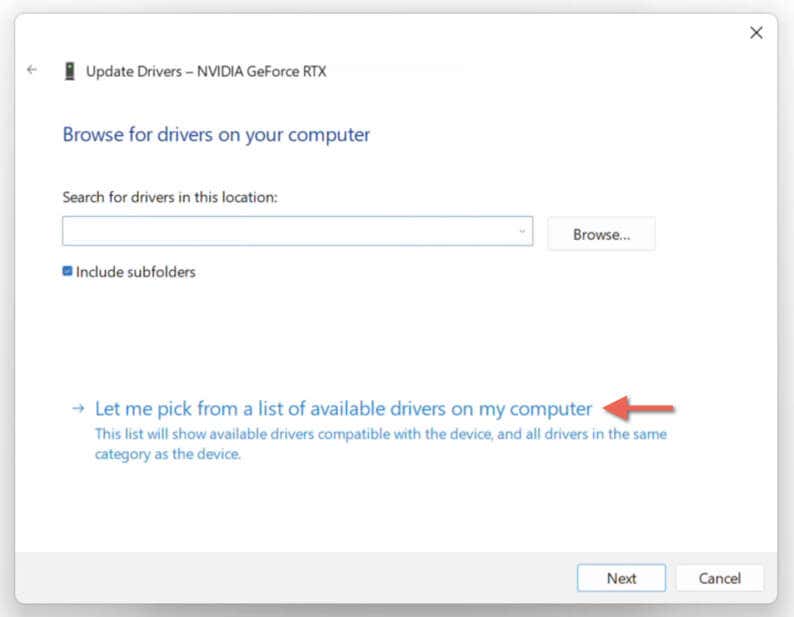
- On the Update Drivers wizard, pick the option labeled Browse my computer for drivers.
- Choose Let me pick from a list of available drivers on my computer.
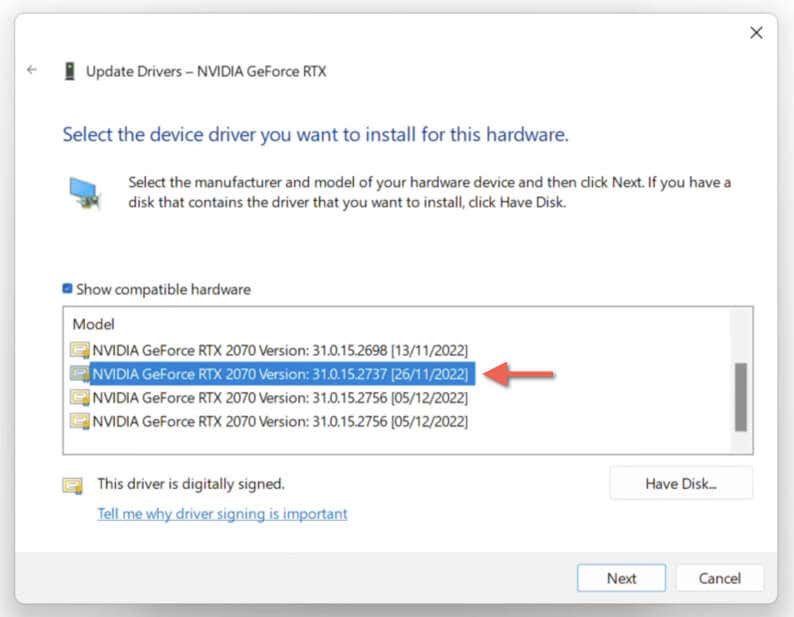
- Check the box next to Show compatible hardware.
- Select an older version from the list—use the version numbers and their release dates for reference—and choose Next.
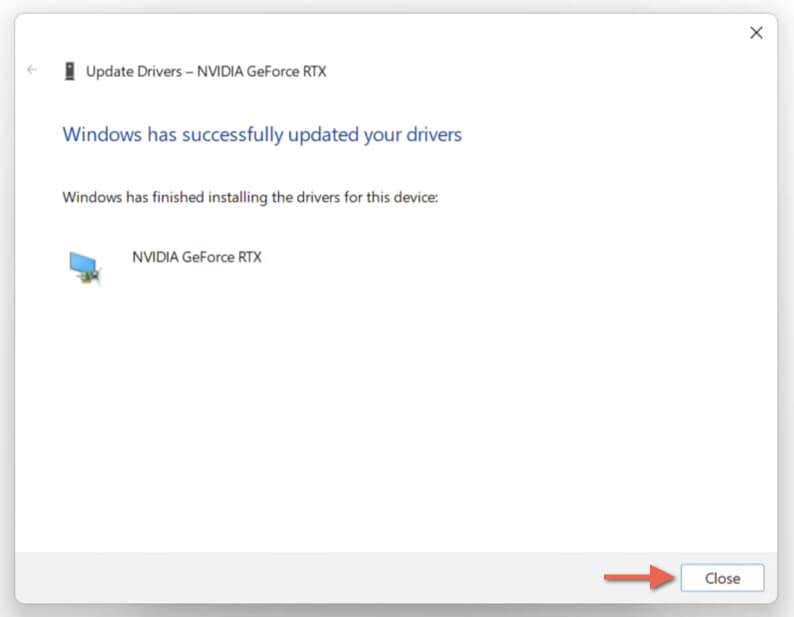
- Wait until Windows finishes rolling back the NVIDIA driver.
- Select Close once the Update Drivers wizard says, "Windows has successfully updated your drivers."
- Exit the Device Manager and restart Windows to finalize the changes.
Download and Downgrade to an Older NVIDIA Driver Version
Suppose the Device Manager in Windows 11 does not provide the option to roll back to a previous version of NVIDIA’s graphics card drivers. In that case, you must manually download and install an older driver version. The process will automatically uninstall the current NVIDIA driver.
- Visit NVIDIA’s GeForce Drivers page.
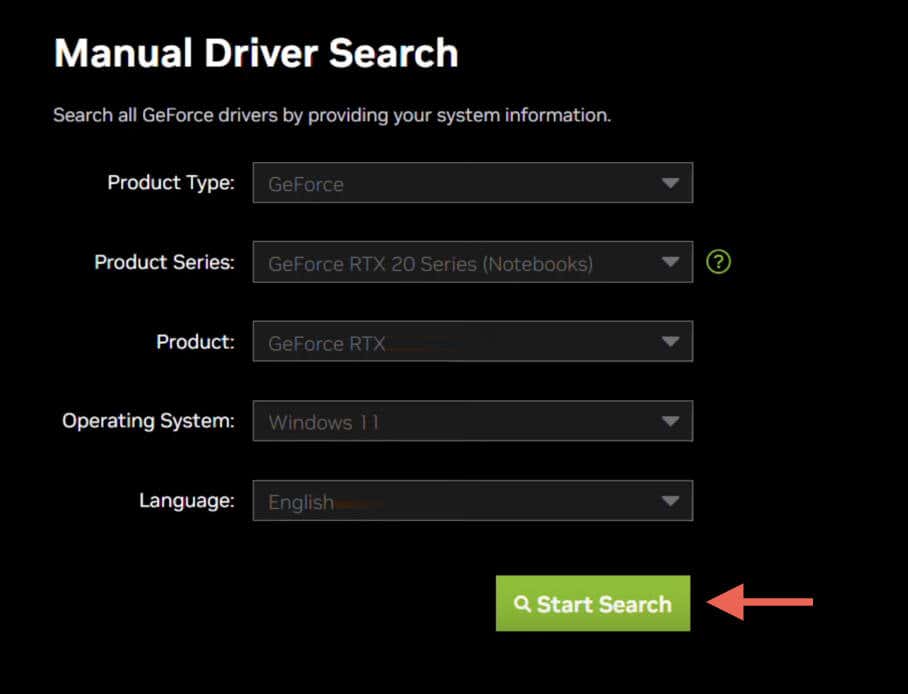
- Interact with the drop-down fields to specify your NVIDIA graphics card details, operating system version (Windows 11, in this case), and language (e.g., English US).
- Select Start Search to generate a list of compatible drivers.
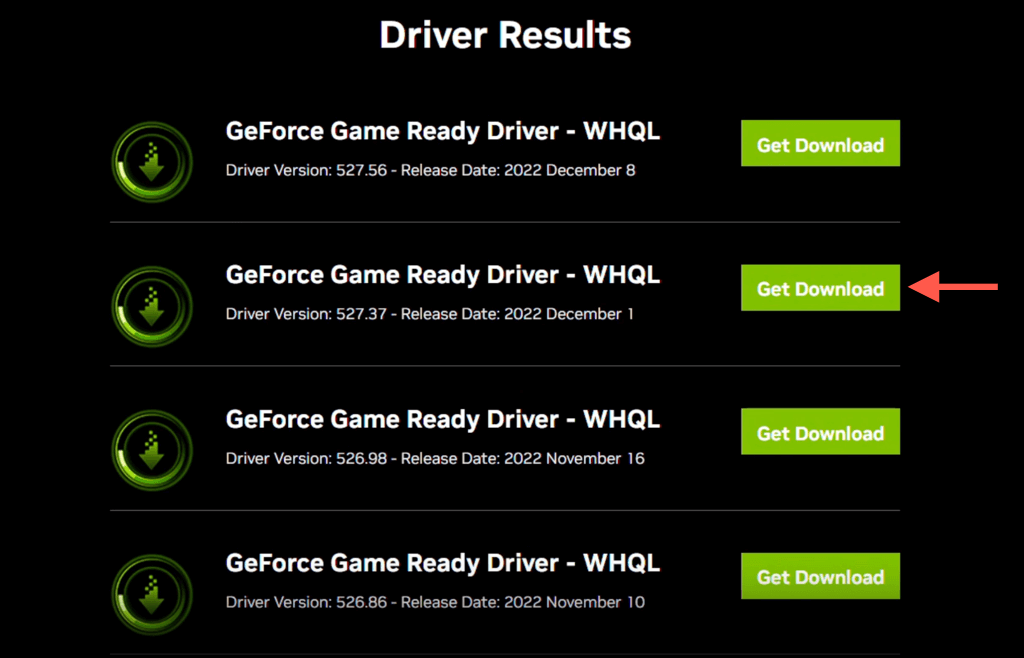
- Look for the driver version you wish to revert to and select Get Download.
- Visit your computer’s Downloads folder and double-click the downloaded driver update file.
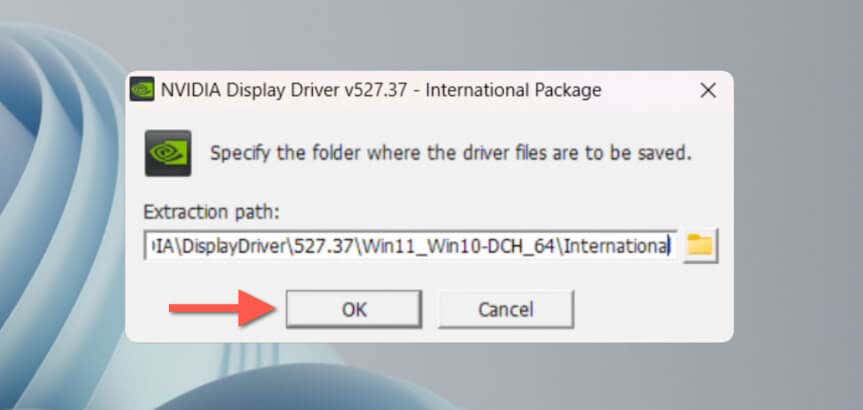
- Pick an extraction directory or leave the default destination intact and wait until the NVIDIA Installer launches itself.
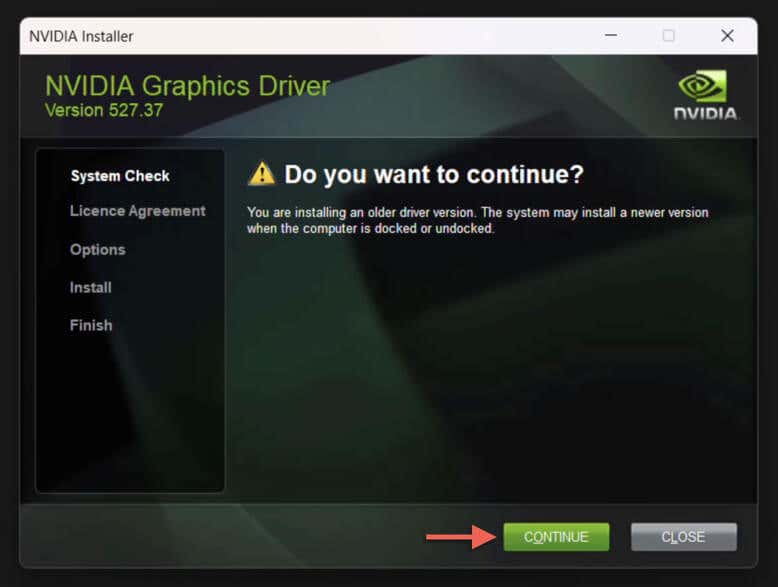
- The NVIDIA installer should detect you’re about to install an older version and prompt you with a "Do you want to continue?" screen—select Continue.
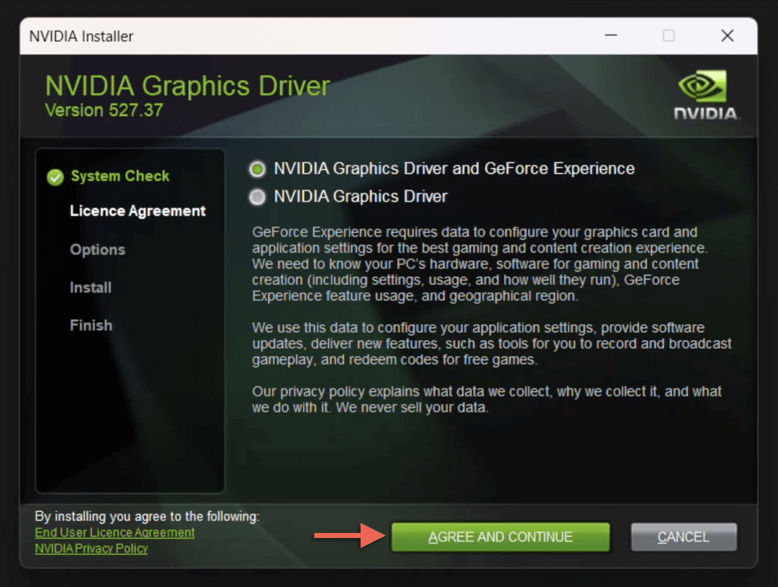
- Select the radio button next to NVIDIA Graphics Driver and GeForce Experience or NVIDIA Graphics Driver—the latter option removes the GeForce Experience app if it’s on your system.
- Select Agree and Continue.
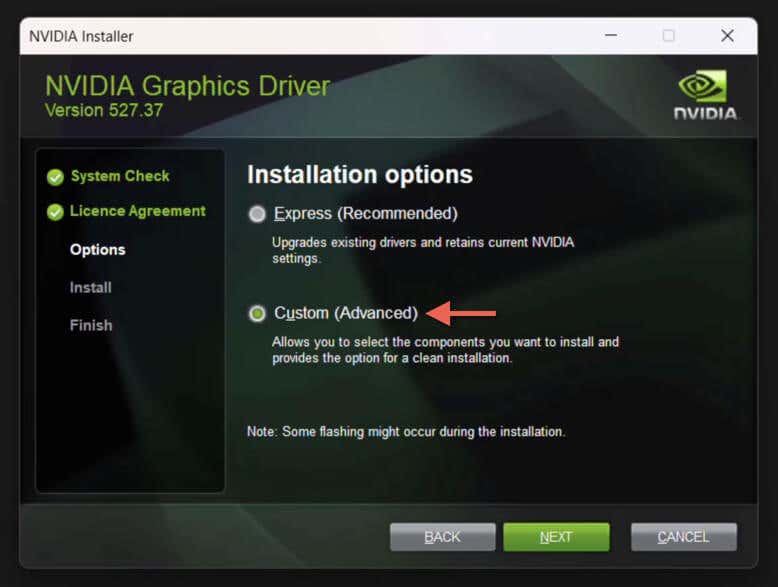
- Choose Custom (Advanced) and select Next.
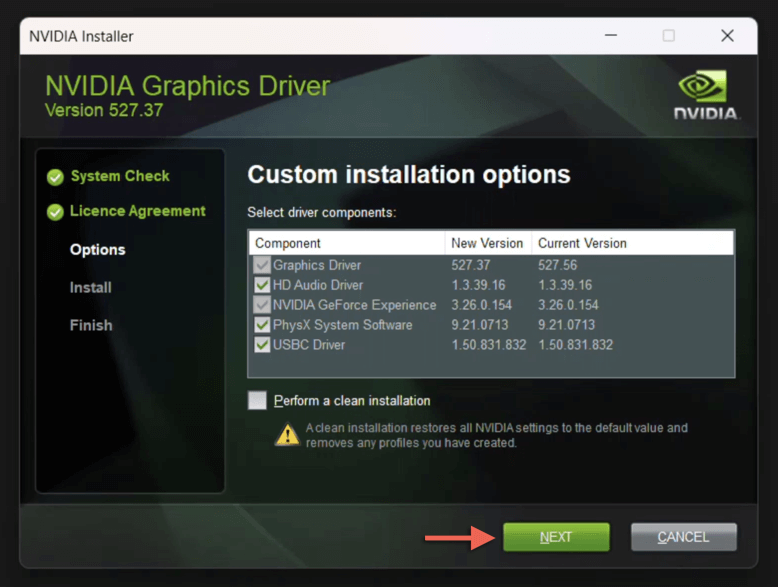
- Uncheck any NVIDIA components to remove during the downgrade—HD Audio Driver, PhysX System Software, and USBC Driver—and enable Perform a clean installation if you’d like to restore all NVIDIA settings to default values.
- Select Next.
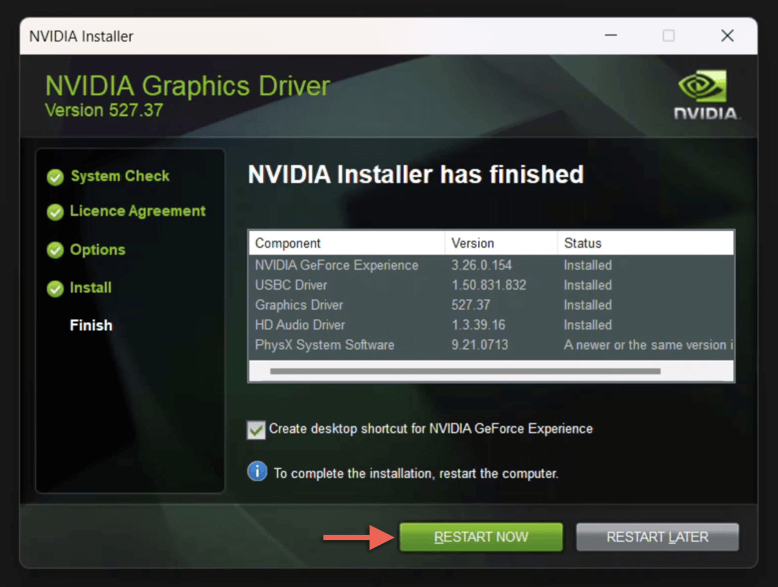
- Wait for the NVIDIA installer to finish downgrading the drivers.
- Select Restart Now.
Uninstall NVIDIA Graphics Drivers Only
If you’re switching display adapters or troubleshooting persistent graphical issues in Windows 11, you must fully uninstall your NVIDIA drivers. The best way to do that is to use a third-party driver removal tool called DDU, or Display Driver Uninstaller, in Safe Mode. Here’s how:
- Visit Wagnarsoft and download the portable/self-extracting version of DDU.
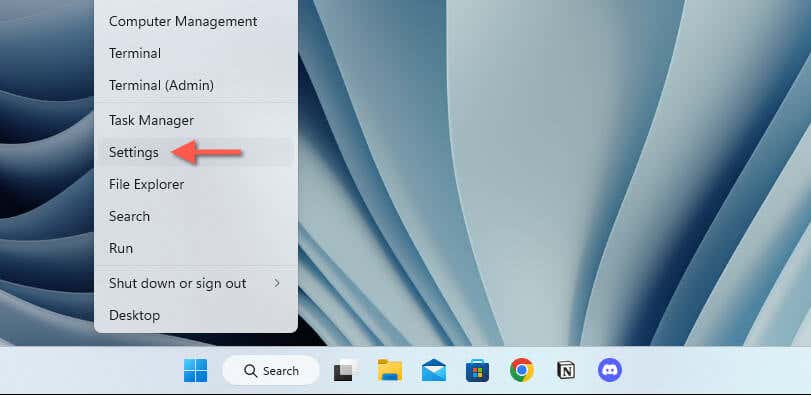
- Open the Start menu and launch Settings.
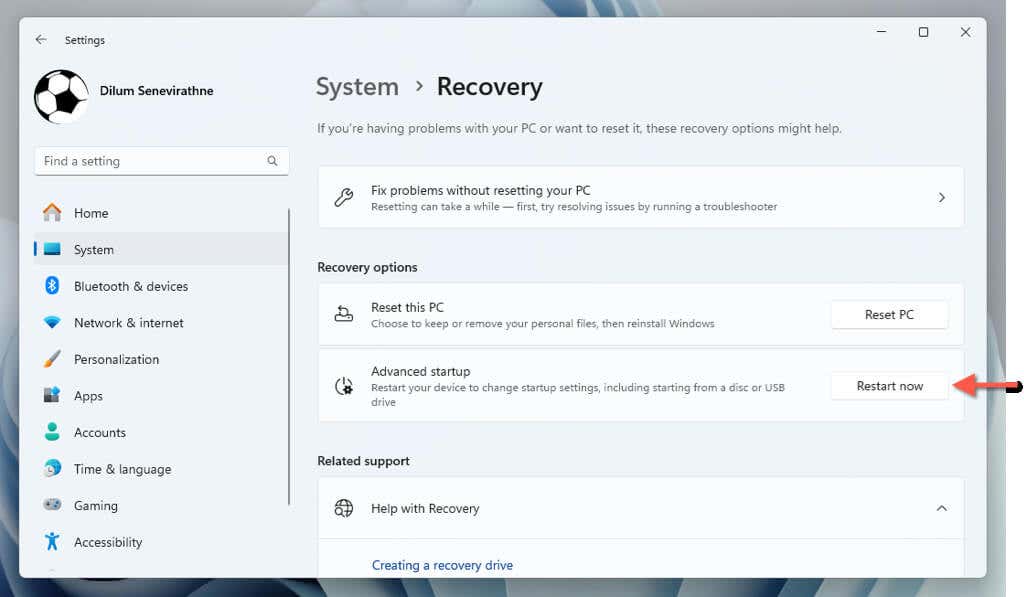
- Go to System > Recovery > Advanced startup and select Restart now.
- Wait for your PC to boot into the Windows Recovery Environment.
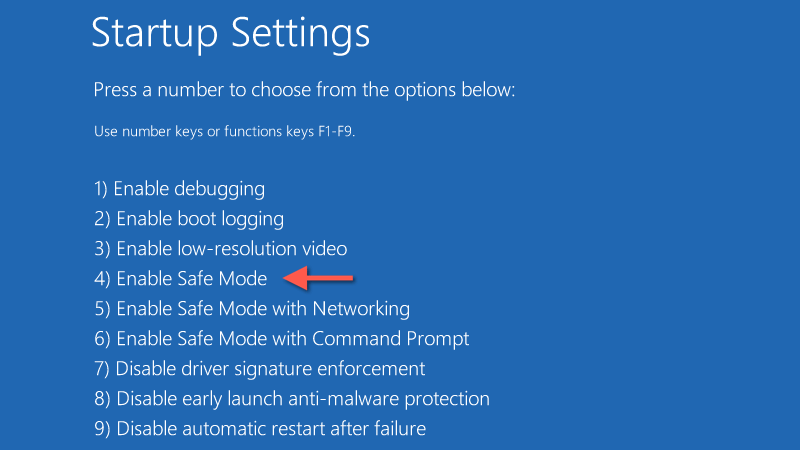
- Select Choose an option > Troubleshoot > Advanced options > Startup Settings > Restart.
- Press 4/F4 on the Startup Settings screen to start your PC in Safe Mode without networking.
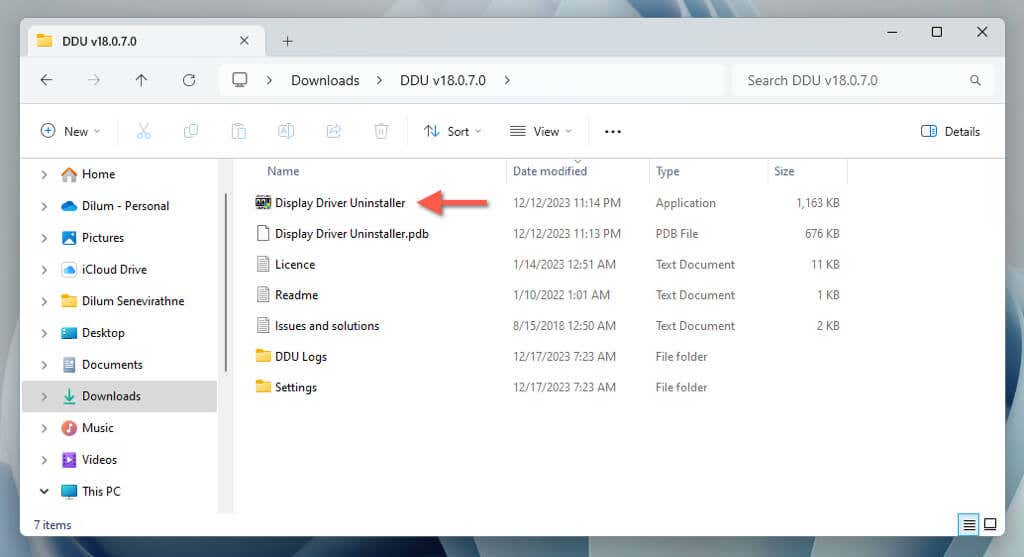
- Visit your computer’s Downloads folder, extract DDU, and double-click Display Driver Uninstaller.
- Select Yes on the User Account Control (UAC) screen.
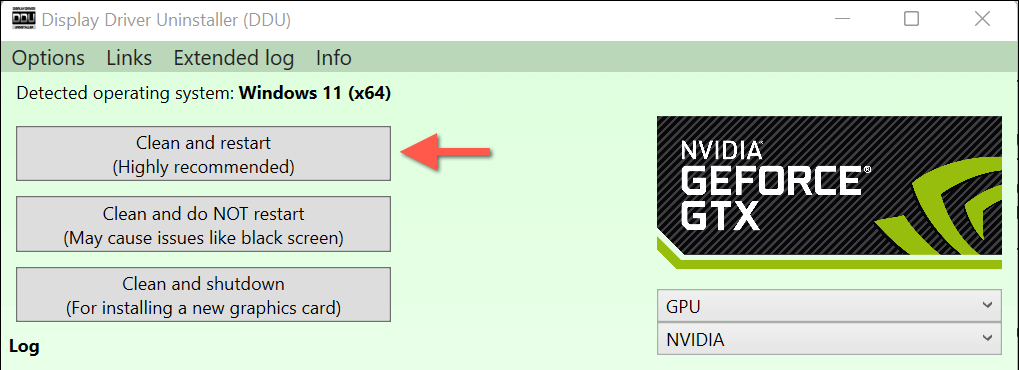
- On the Display Driver Uninstaller (DDU) that shows up, select the Clean and restart (Highly Recommended) option.
- Wait until DDU removes the NVIDIA GPU drivers. Windows 11 should automatically reboot and exit Safe Mode after that.
If you intend to upgrade your graphics card, you can install the new GPU and its drivers now. If you’re trying to fix a problem, try reinstalling the current or an older version of the NVIDIA driver.
That’s a Wrap
As you just learned, rolling back or uninstalling an NVIDIA device driver in Windows 11 is quite straightforward. You can use the Device Manager’s rollback feature, manually choose an older version, or download a previous version from NVIDIA’s website. These methods are effective in fixing issues caused by problematic driver updates.
Additionally, if upgrading your graphics card or dealing with ongoing issues, you can use DDU (Display Driver Uninstaller) to remove NVIDIA drivers completely.
The post How to Rollback or Uninstall NVIDIA Drivers in Windows 11 first appeared on Help Desk Geek.
Source : How to Rollback or Uninstall NVIDIA Drivers in Windows 11

Comments
Post a Comment